Salon Academy Management: Set Up Courses, Batches & Students
Set up your beauty academy step by step: create courses, add mentors, run batches, enroll students, track attendance, manage leads and issue certificates.
blog
•Oct 12, 2026
•7 min read
Table of contents



How to Manage a Salon or Beauty Academy in Chairlyo: A Getting Started Guide
To set up a beauty academy in Chairlyo, open the Academy module and work through the steps in order. Check your overview, create a course, add a mentor, create a batch, add and enroll students, then issue certificates once the batch is complete. Attendance tracking and lead management can be added as your academy grows.
Many beauty businesses run training courses alongside their services. Tracking those courses in notebooks, spreadsheets and chat groups gets messy quickly. The Academy module in Chairlyo’s all-in-one salon platform keeps your courses, mentors, batches, students and certificates in one place.
This guide covers the full first-time setup, then shows you how to track attendance and manage leads.
Set Up Your Academy in 8 Steps
The basic flow is: Overview → Course → Mentor → Batch → Students → Certificate. Follow the steps in this order, because each one depends on the one before it. A batch needs a course and a mentor, and an enrollment needs a student and a batch.
Step 1: Check Your Academy Overview
Go to Academics > Overview.
The overview shows your academy’s current status at a glance. It covers active students, batches and mentors, revenue collected, upcoming batches, popular courses and top-performing mentors. If you already use the revenue trends and key business numbers in your salon dashboard, this will feel familiar. It’s the same idea, applied to your academy.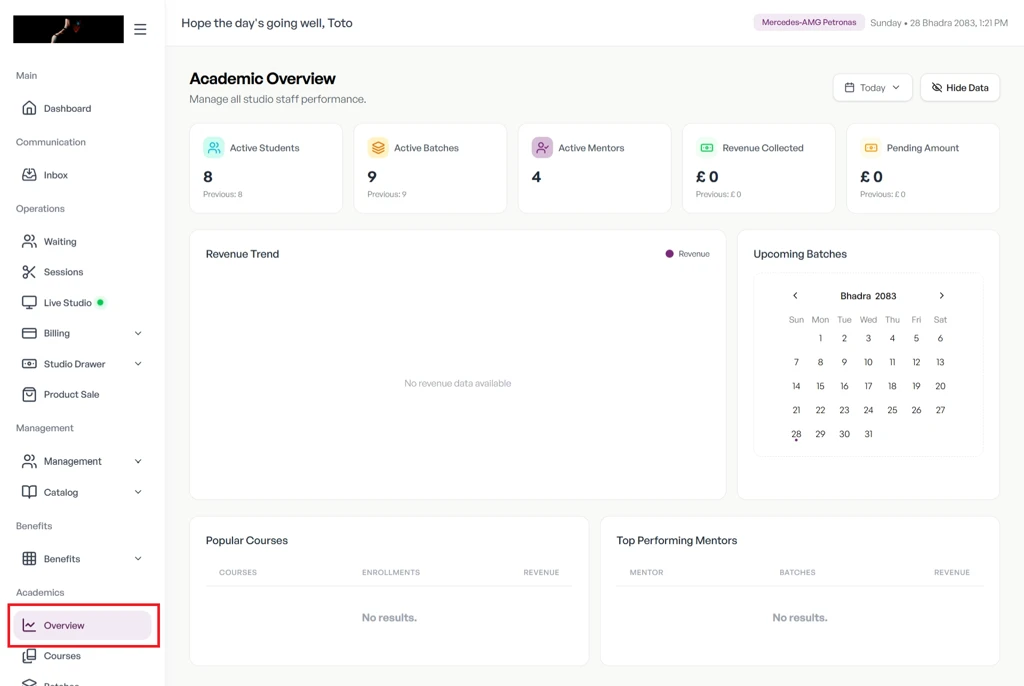
Step 2: Create a Course
Go to Academics > Courses and select + Add Course.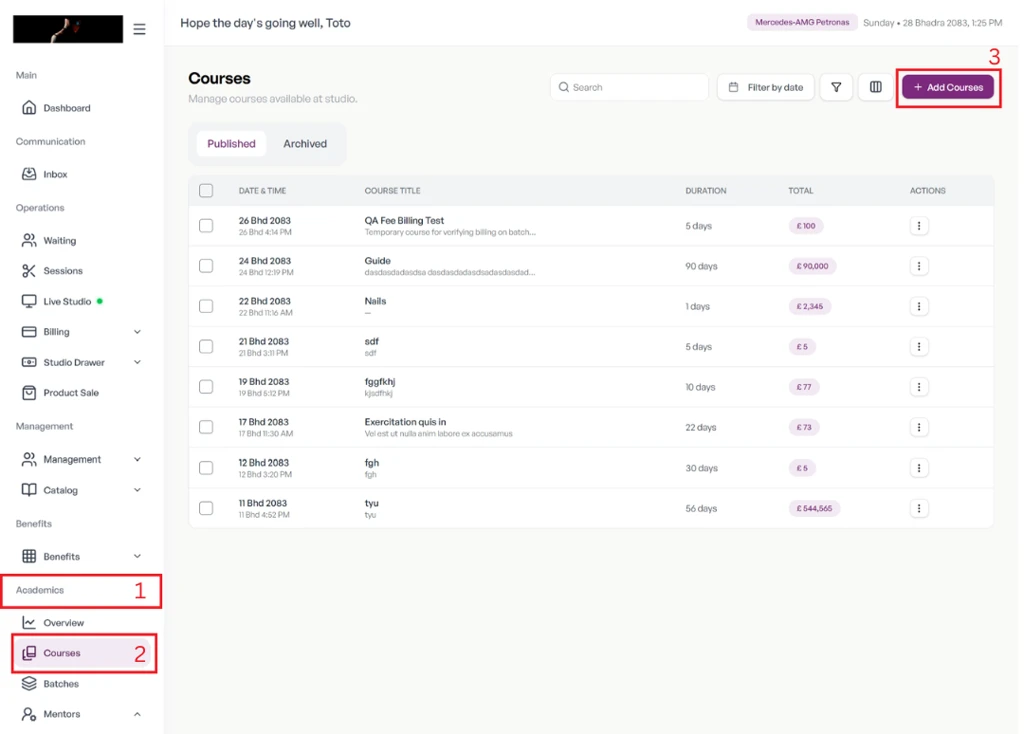
Enter the course details:
- Course Title
- Course Description
- Duration
- Total Hours
- Course Fee
You can also add a Curriculum Outline, but it’s optional. Select Add Course to save.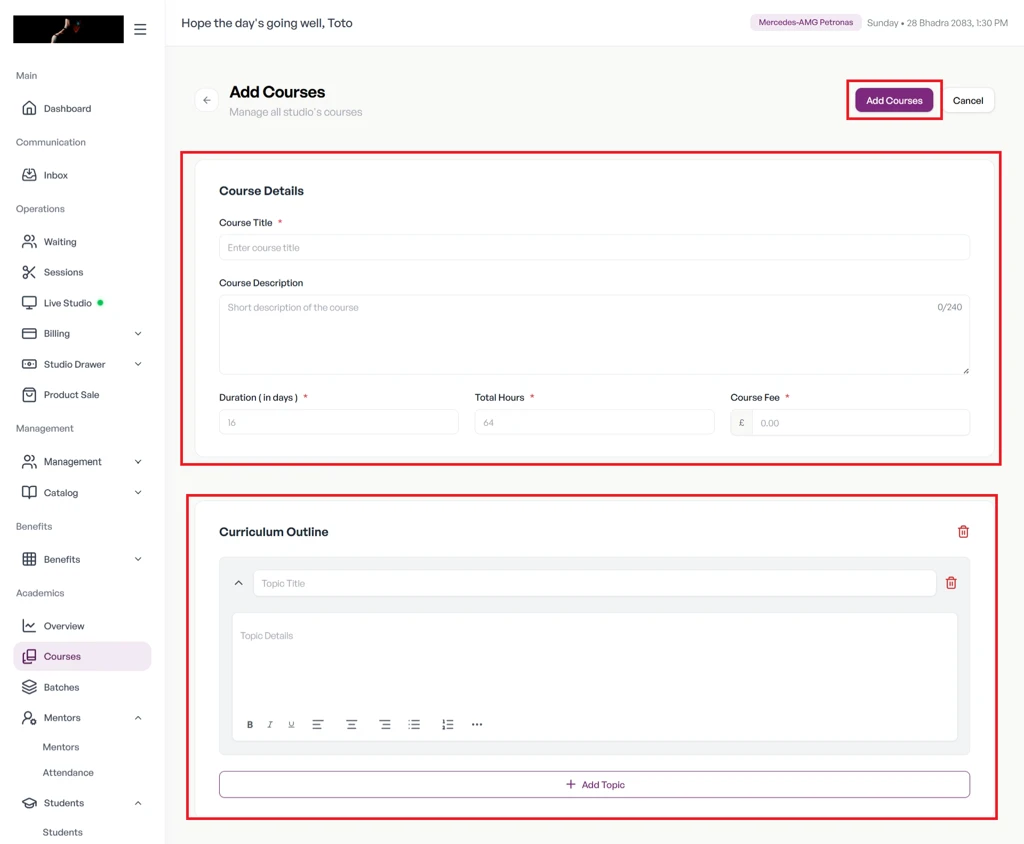
Step 3: Add a Mentor
Once you’ve created a course, add the mentor who will teach it.
Go to Academics > Mentors and select + Add Mentor. Choose whether the mentor is Internal or External, enter the required details and save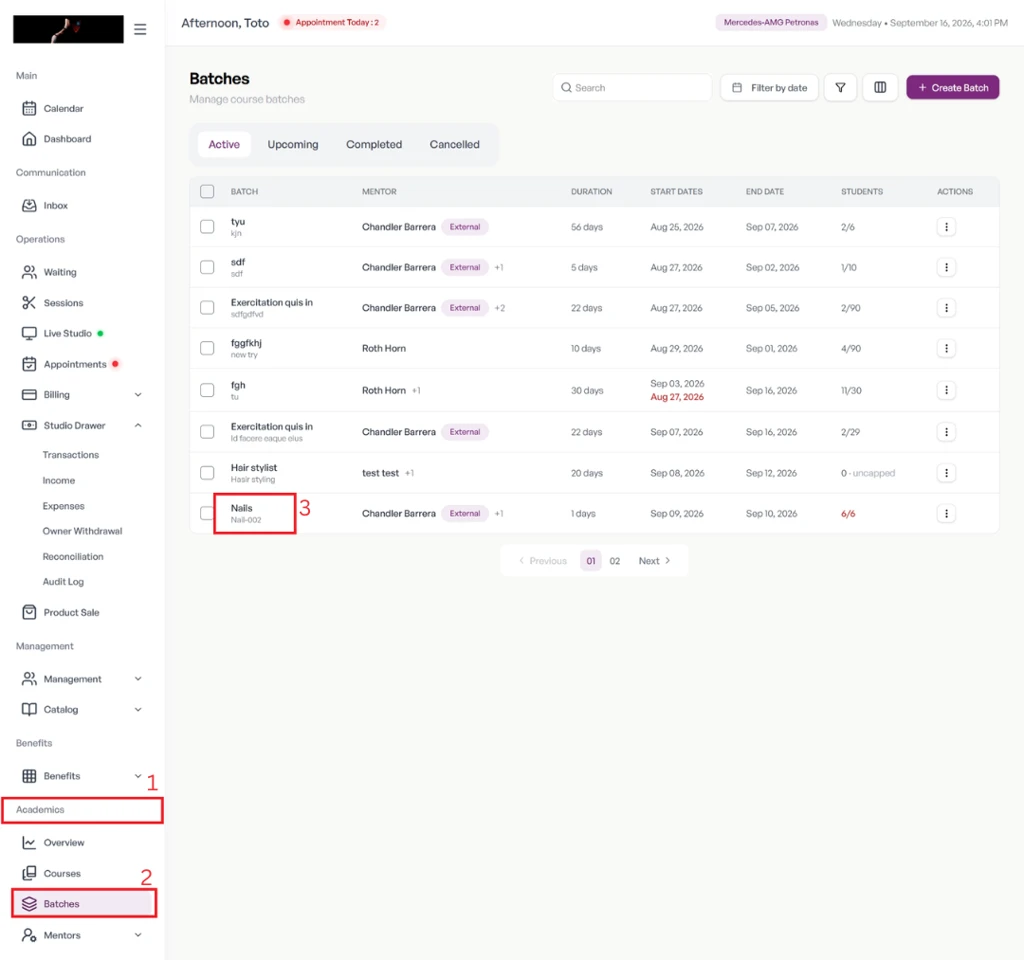
Running an academy next to a busy salon means managing a lot of people’s time. Your service team’s schedules sit in the staff schedule and availability tools, while academy mentors are added here in the Academy module.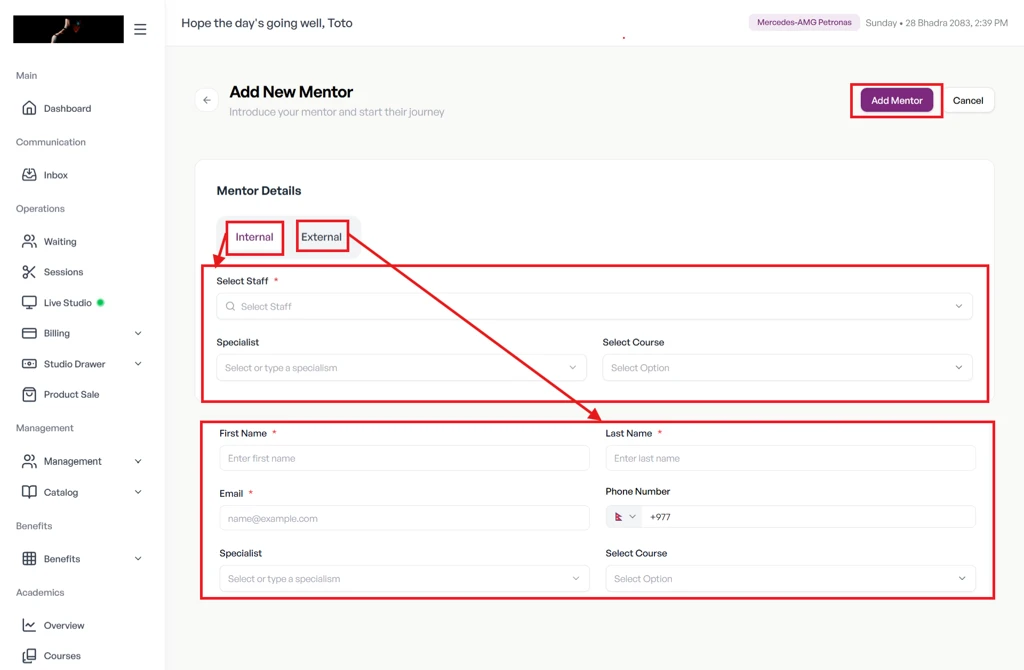
Step 4: Create a Batch
A batch is a group of students taking a course together. Go to Academics > Batches and select + Add Batches.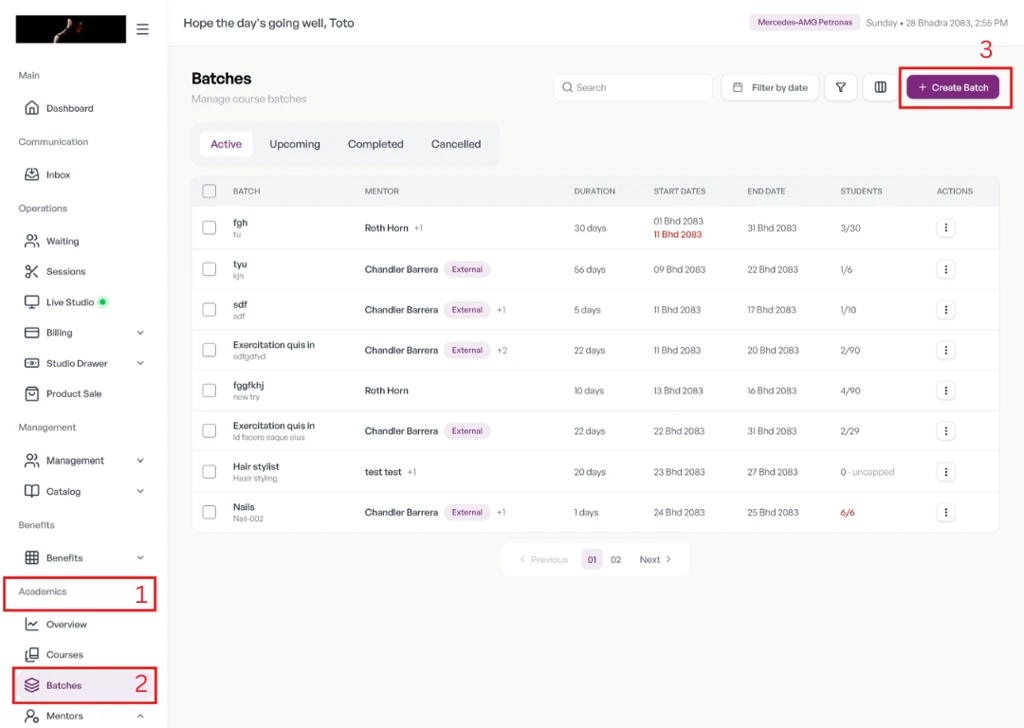
Enter the batch details:
- Batch Title
- Course
- Mentor
- Maximum Capacity
- Start Date
- End Date
Select Create Batch to save.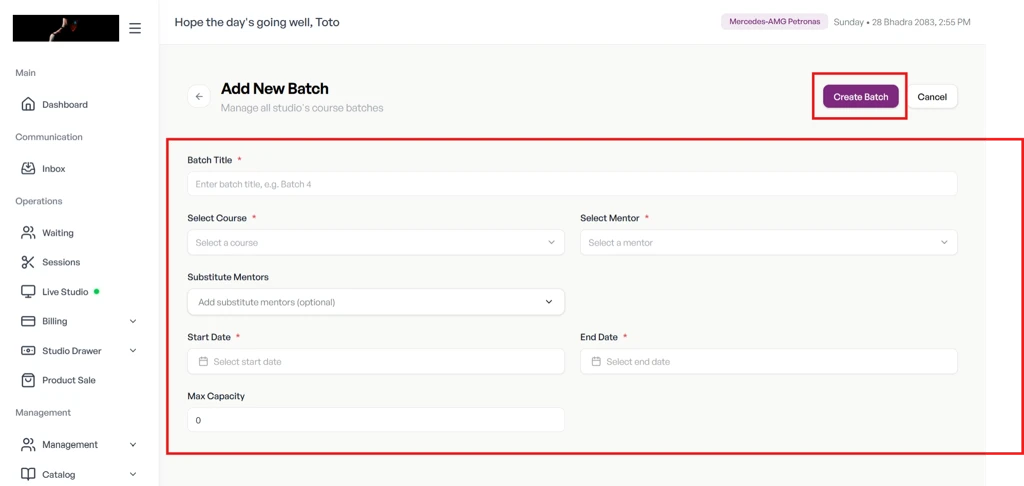
Step 5: Add a Student
Go to Academics > Students and select + Add Student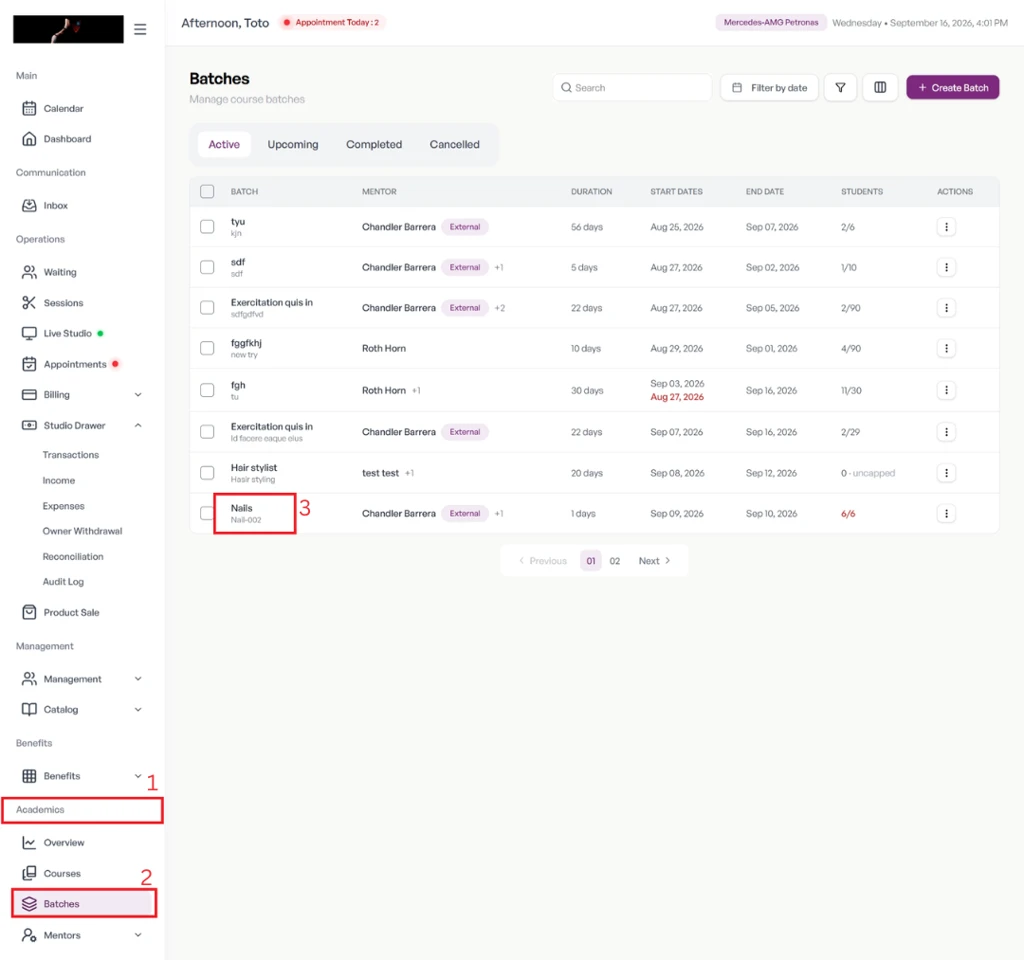
Enter the student’s details and select their course. You can also process the student’s payment during enrollment if you need to. Select Save to add the student.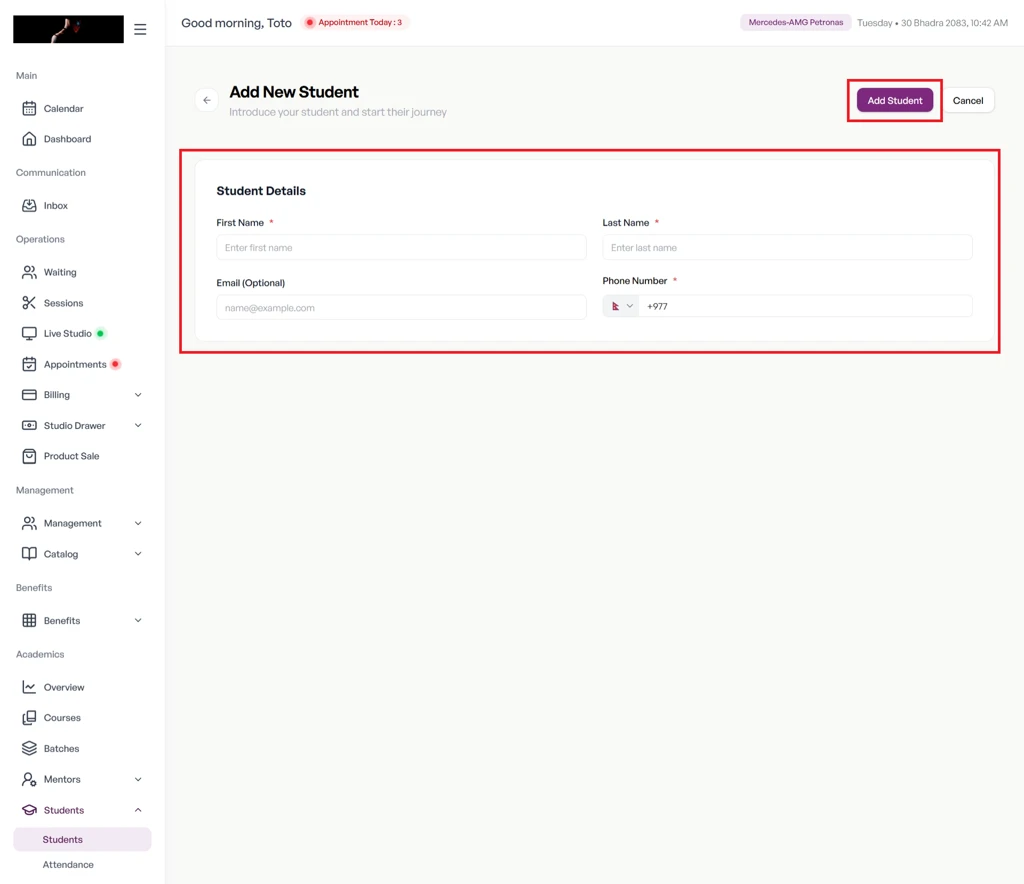
Step 6: Enroll a Student
Adding a student isn’t the same as enrolling them. Go to Academics > Students and select Enroll Student.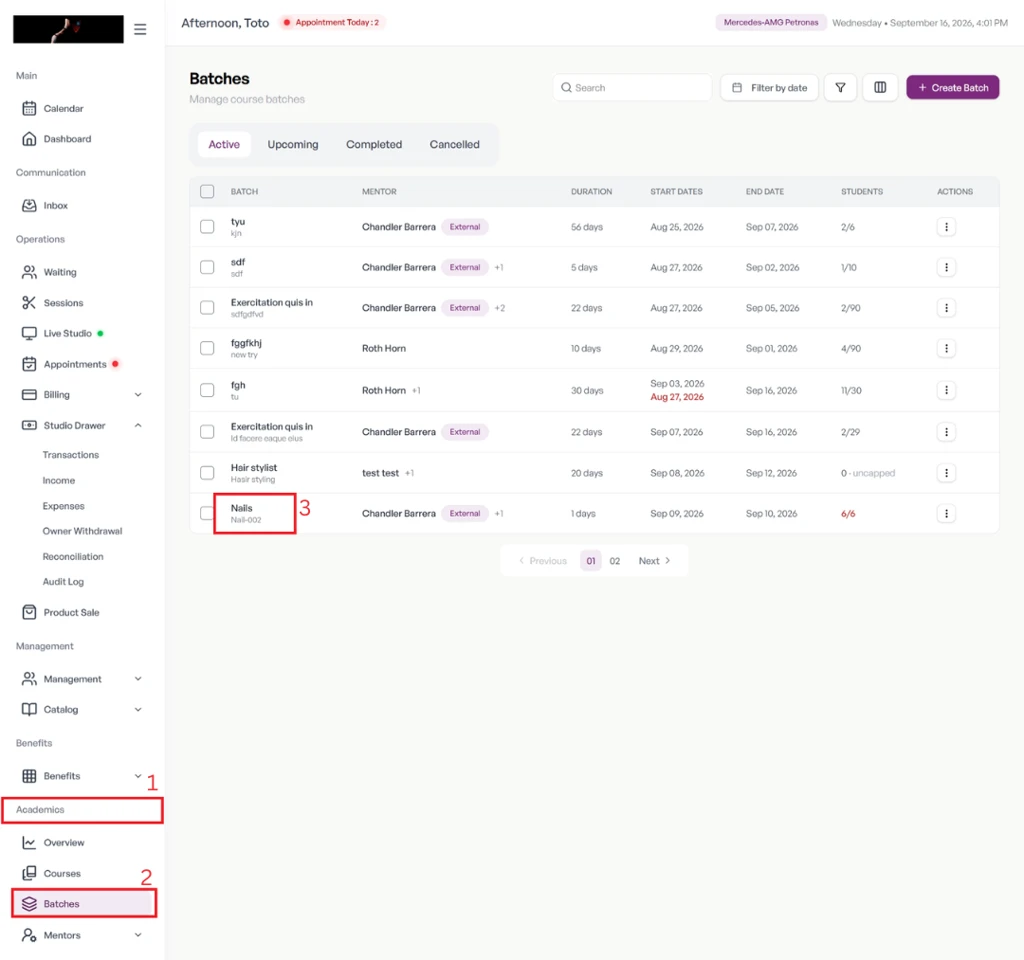
In the enrollment window, select the Student, the Course and the right Batch, then complete the enrollment.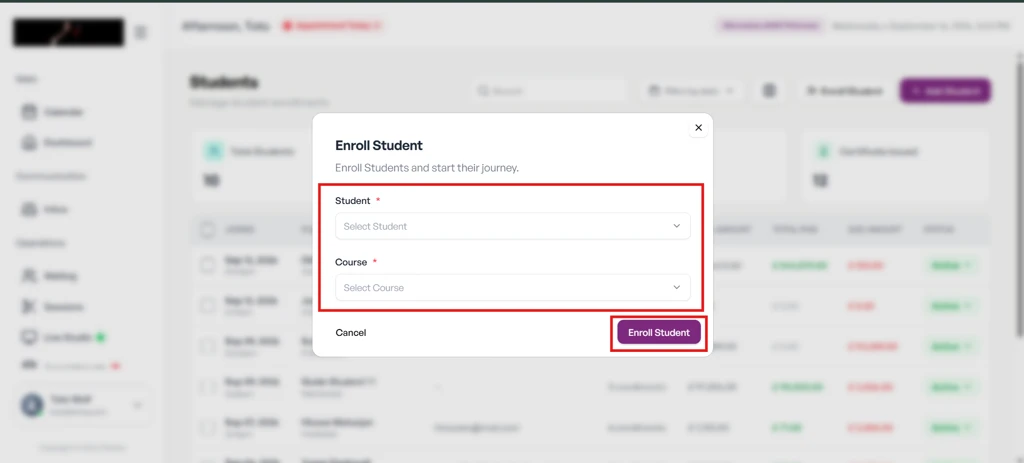
Step 7: Complete a Batch
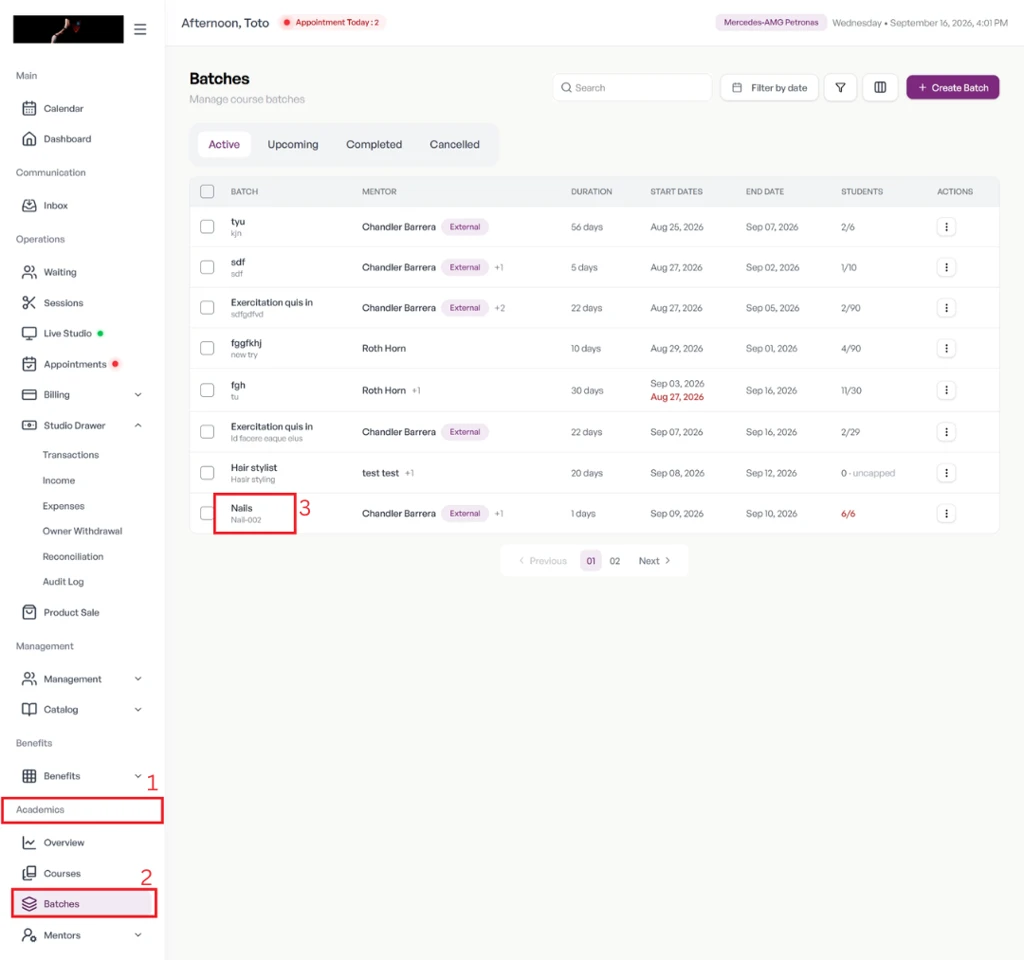
When a batch finishes, go to Academics > Batches and select the batch you want to close. 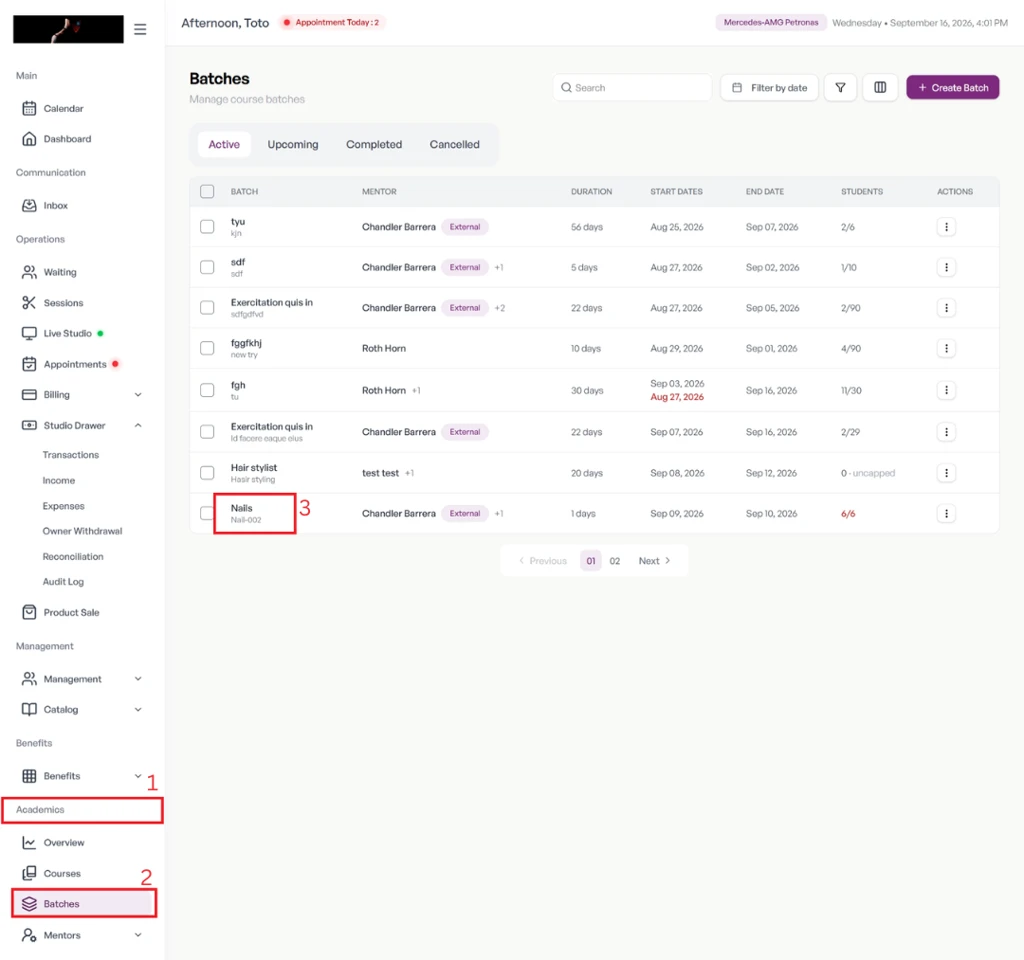
Select click on Action button from list of the student you want to issue certificate.
Click on Complete Batch.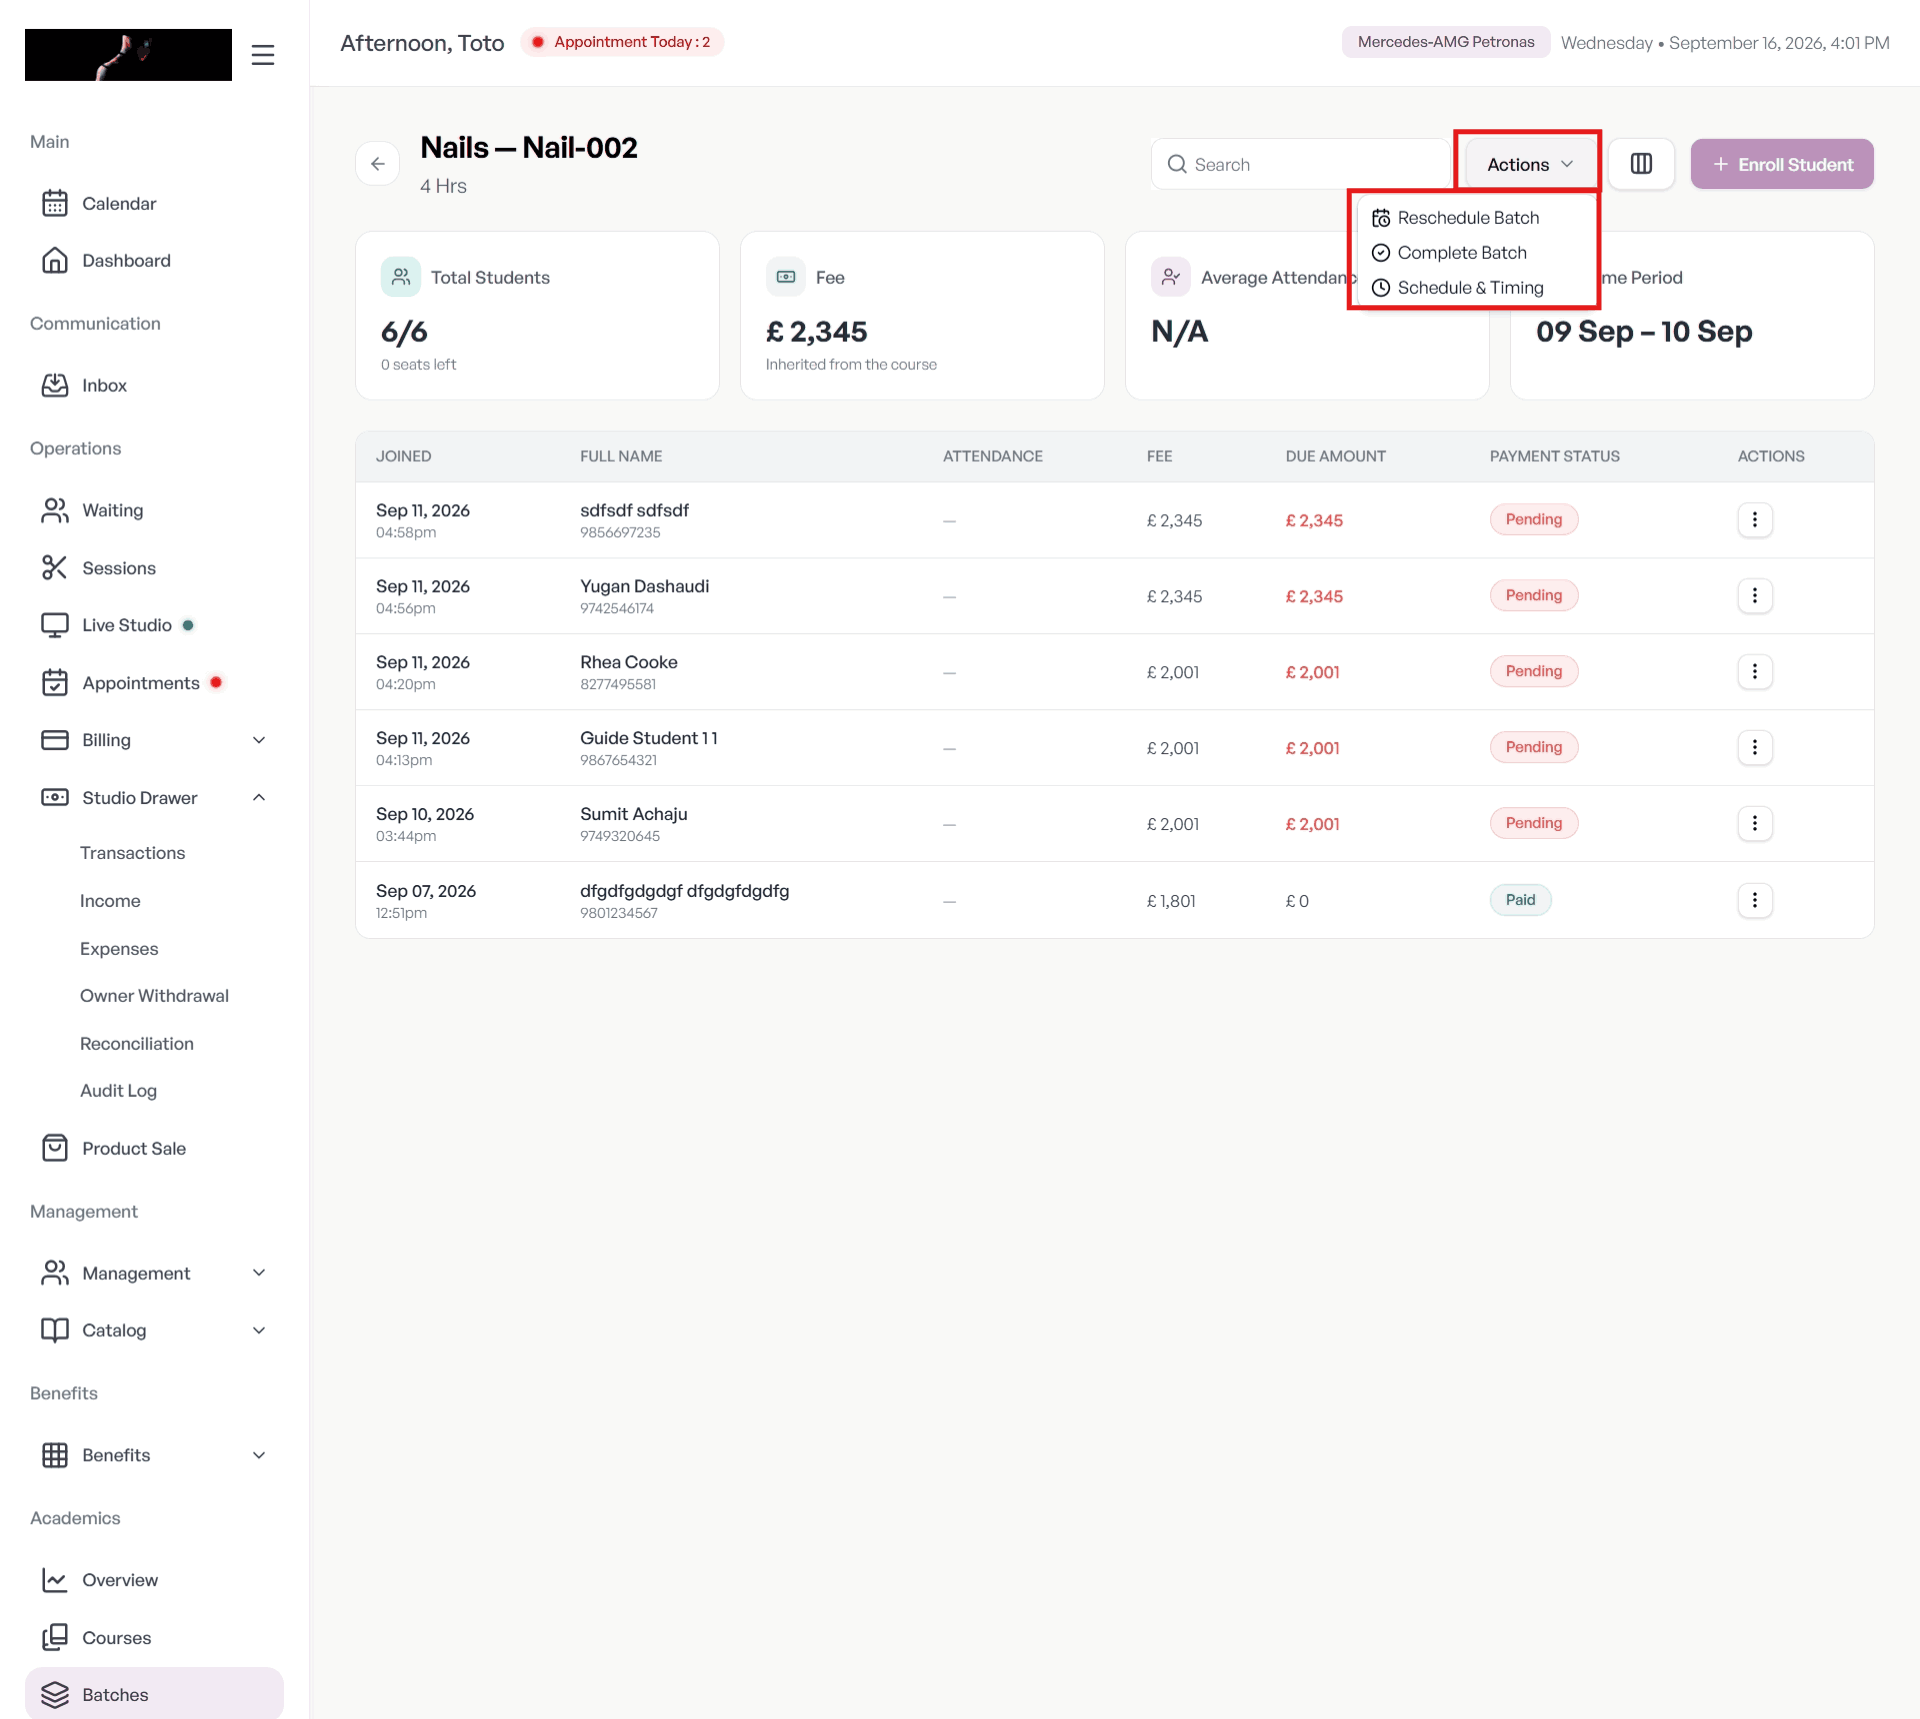
Step 8: Issue a Certificate
After a student completes their course, you can issue their certificate from the Batches section.
- Go to Academics > Batches and open the student’s batch.
- Select the action (⋮) button next to the student.
- Click Issue Certificate.
You’re now ready to run your academy with Chairlyo.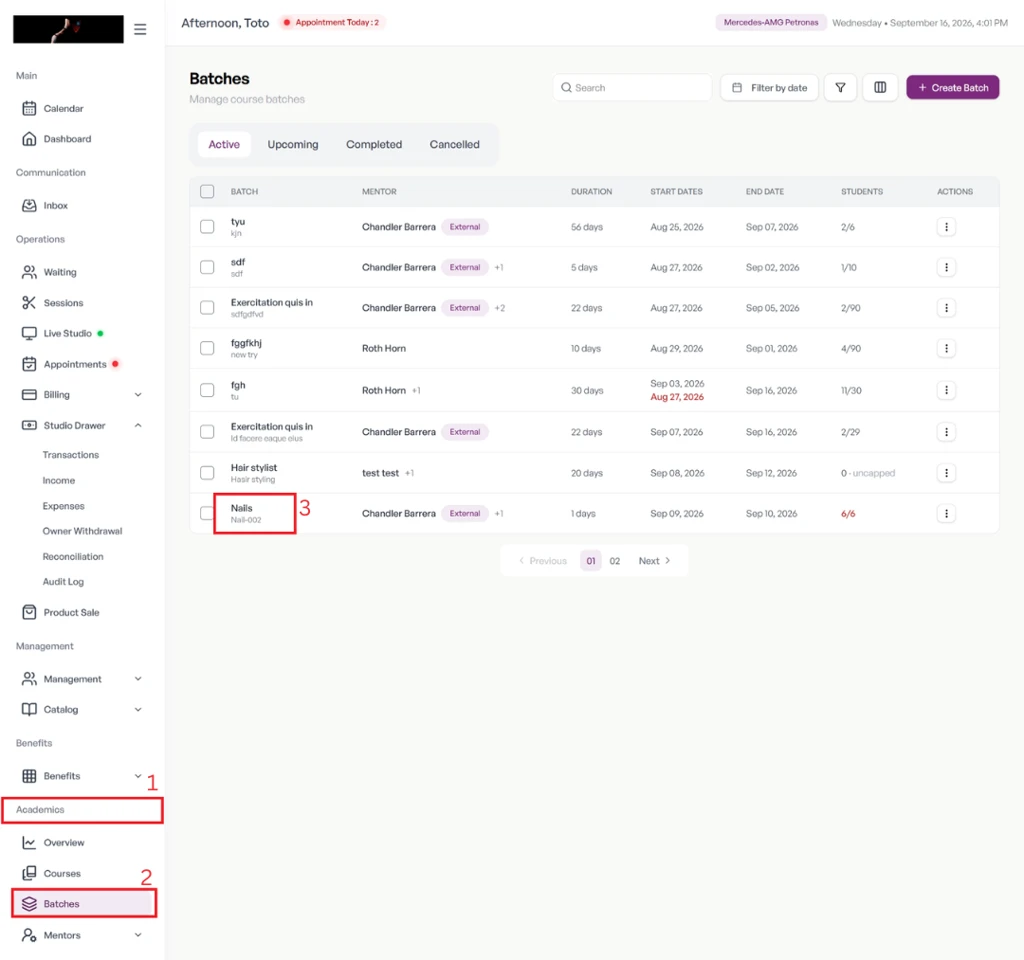
Track Mentor and Student Attendance
Once a batch is running, attendance keeps your records accurate for both mentors and students.
How to Record Mentor Attendance
Mentor attendance tracks the check-in and check-out time of mentors assigned to running batches.
- Go to Academics > Mentor > Attendance.
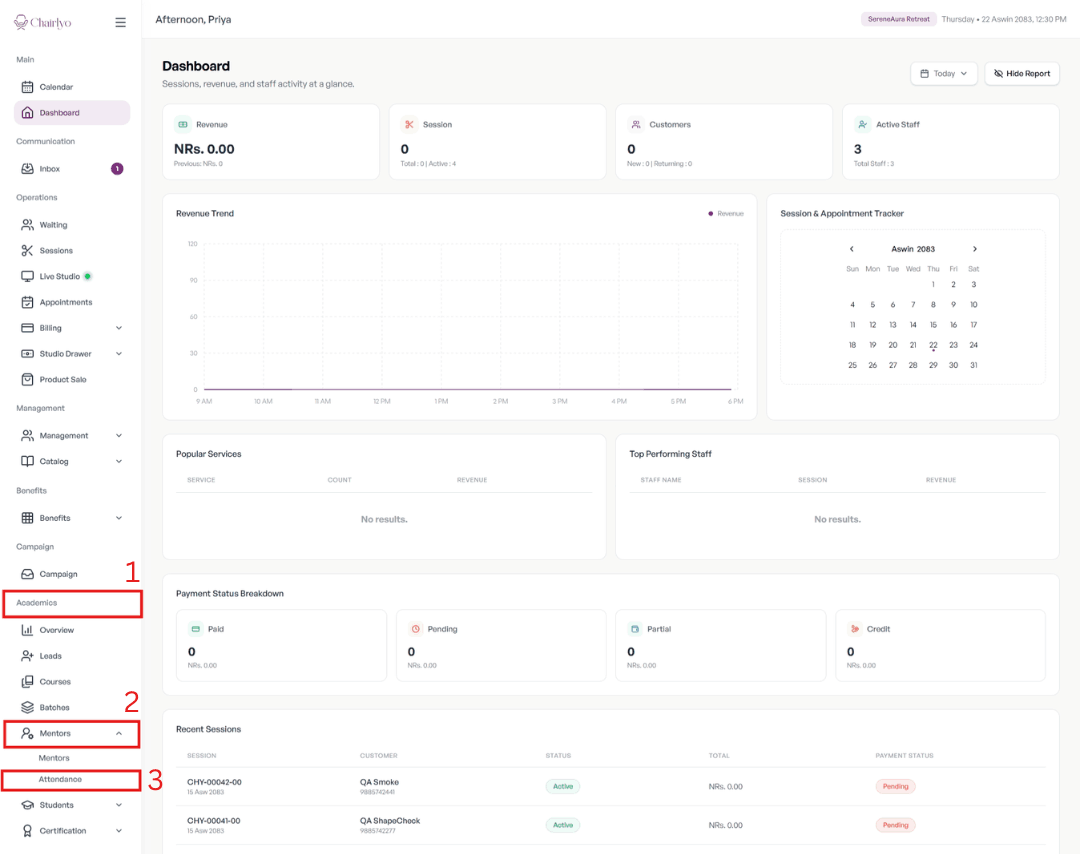
- Review the running batches and their mentors. Use the Search field, or the Batches and Date filters, to narrow the list.
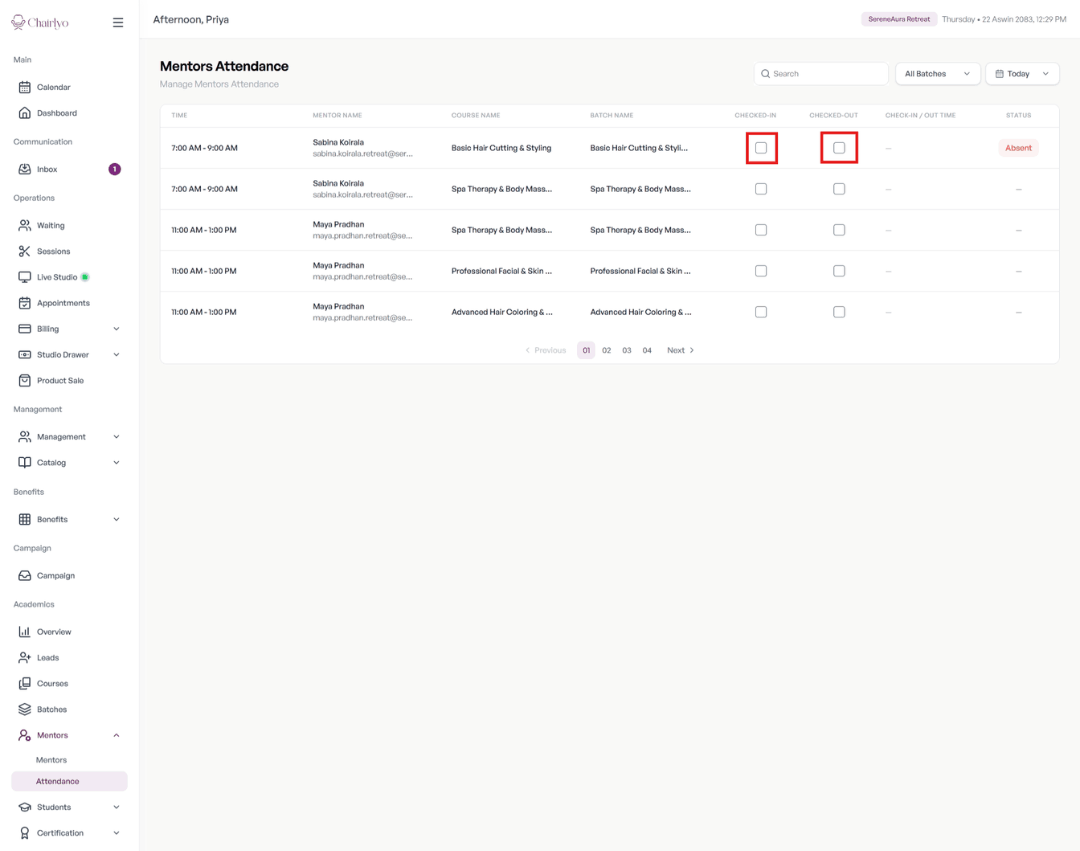
- Find the mentor’s row and select the Check In box when they arrive.
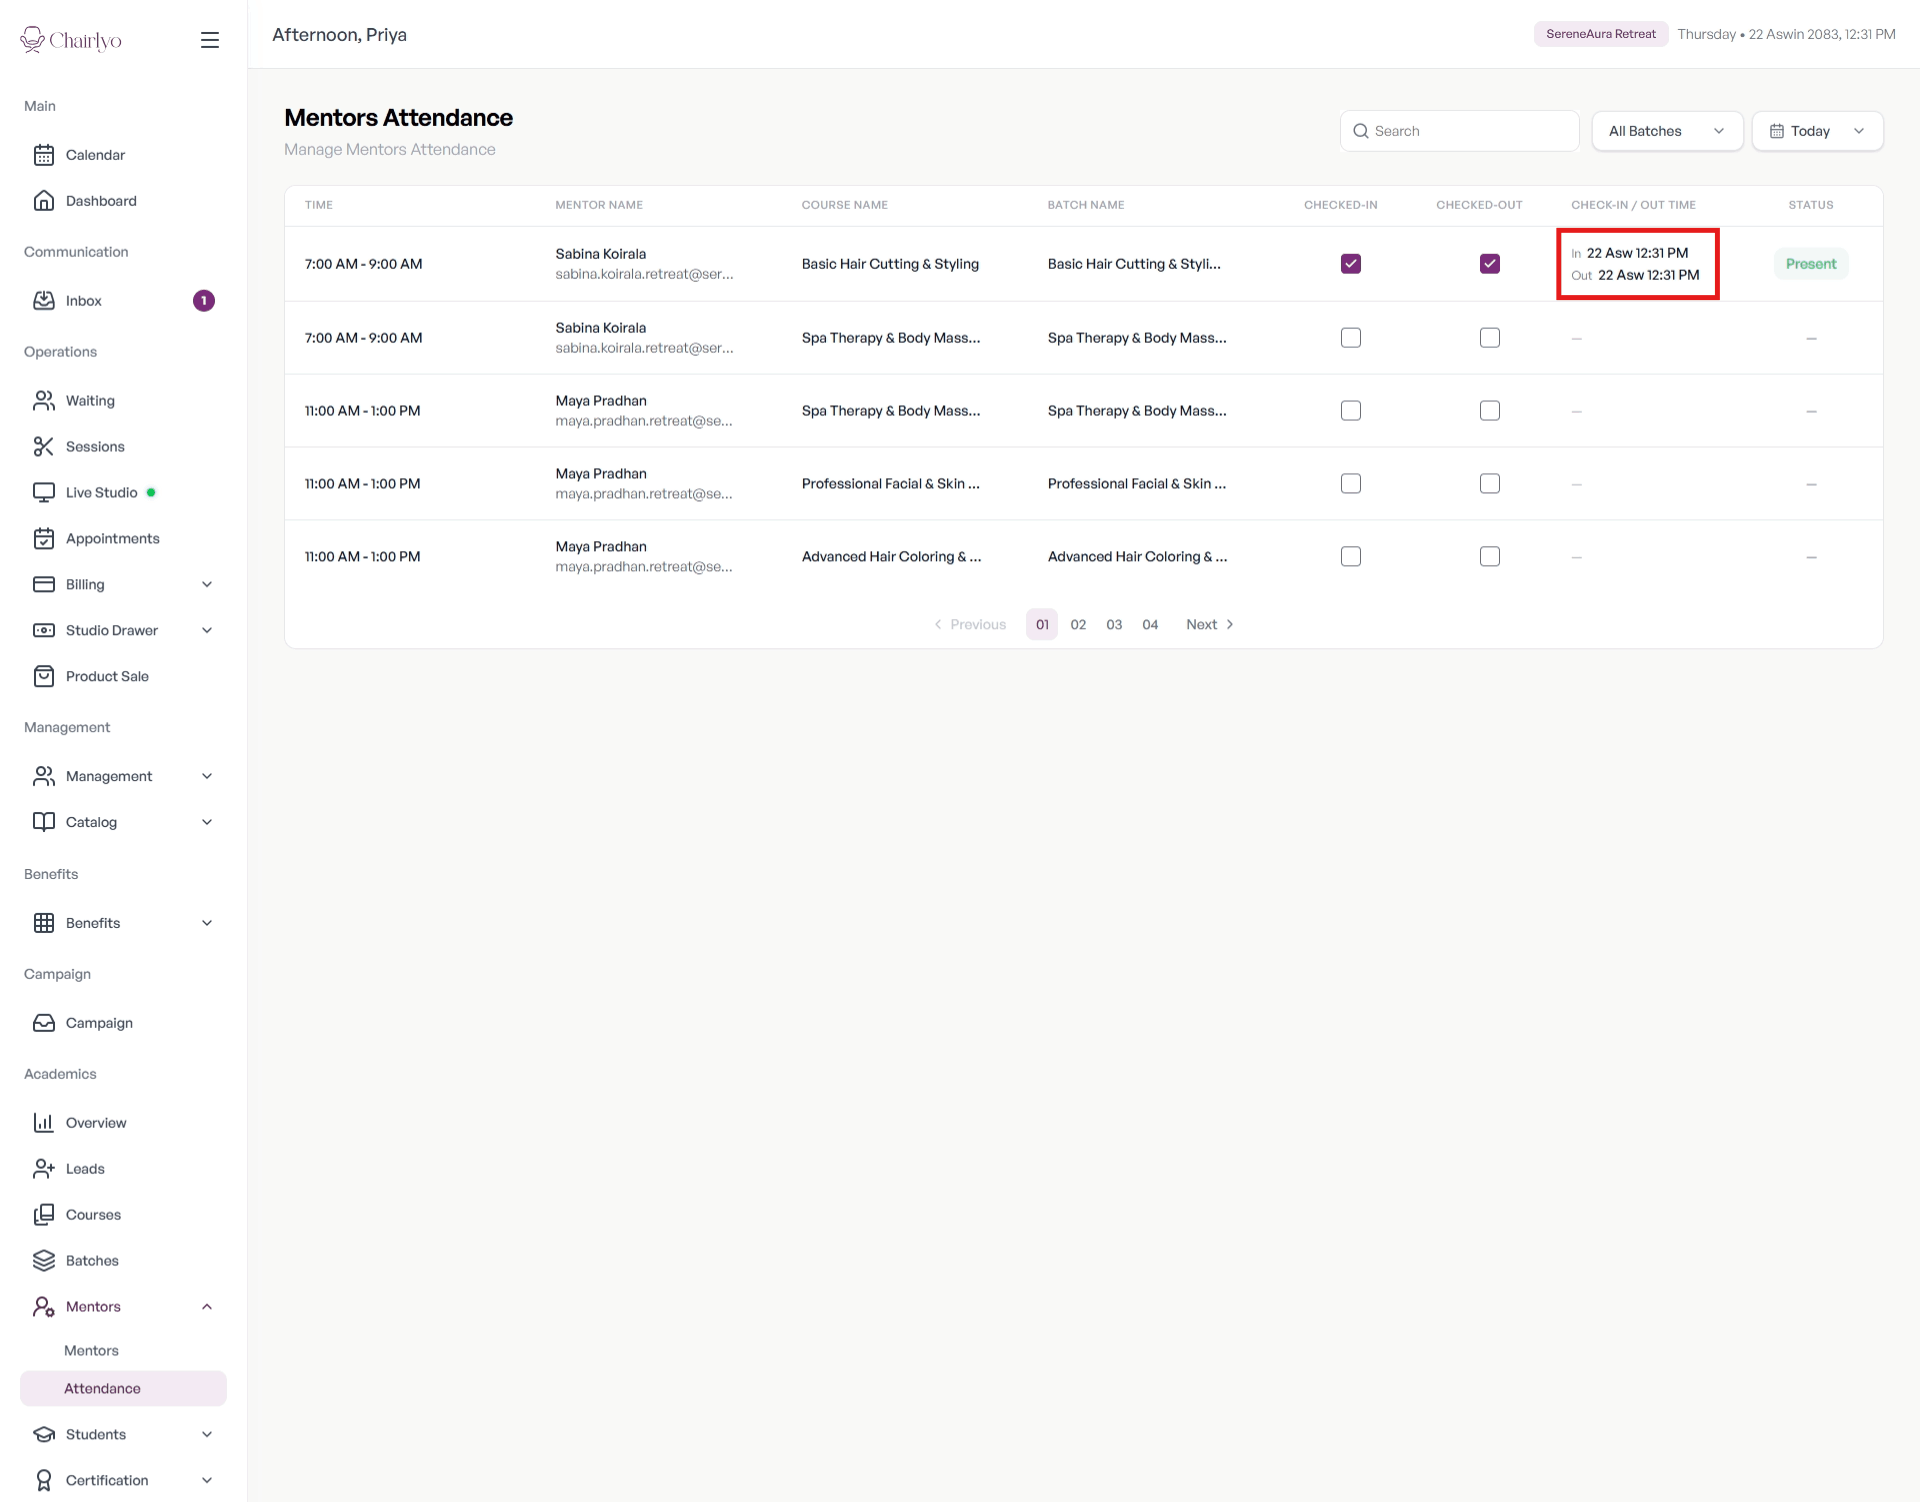
- Select the Check Out box when they leave.
The time of each check-in and check-out is recorded beside the attendance boxes. For a wider view of your people, you can also see how each team member is performing across your salon.
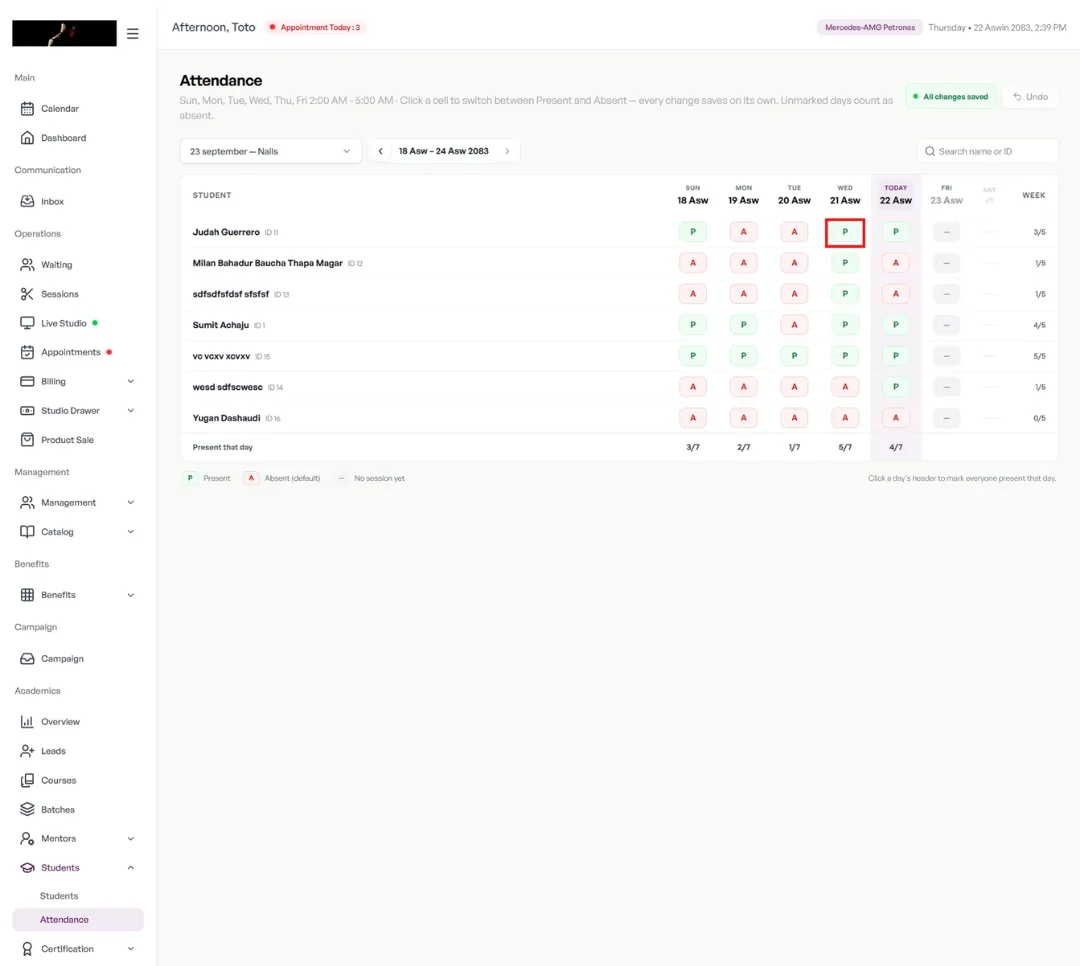
How to Mark Student Attendance
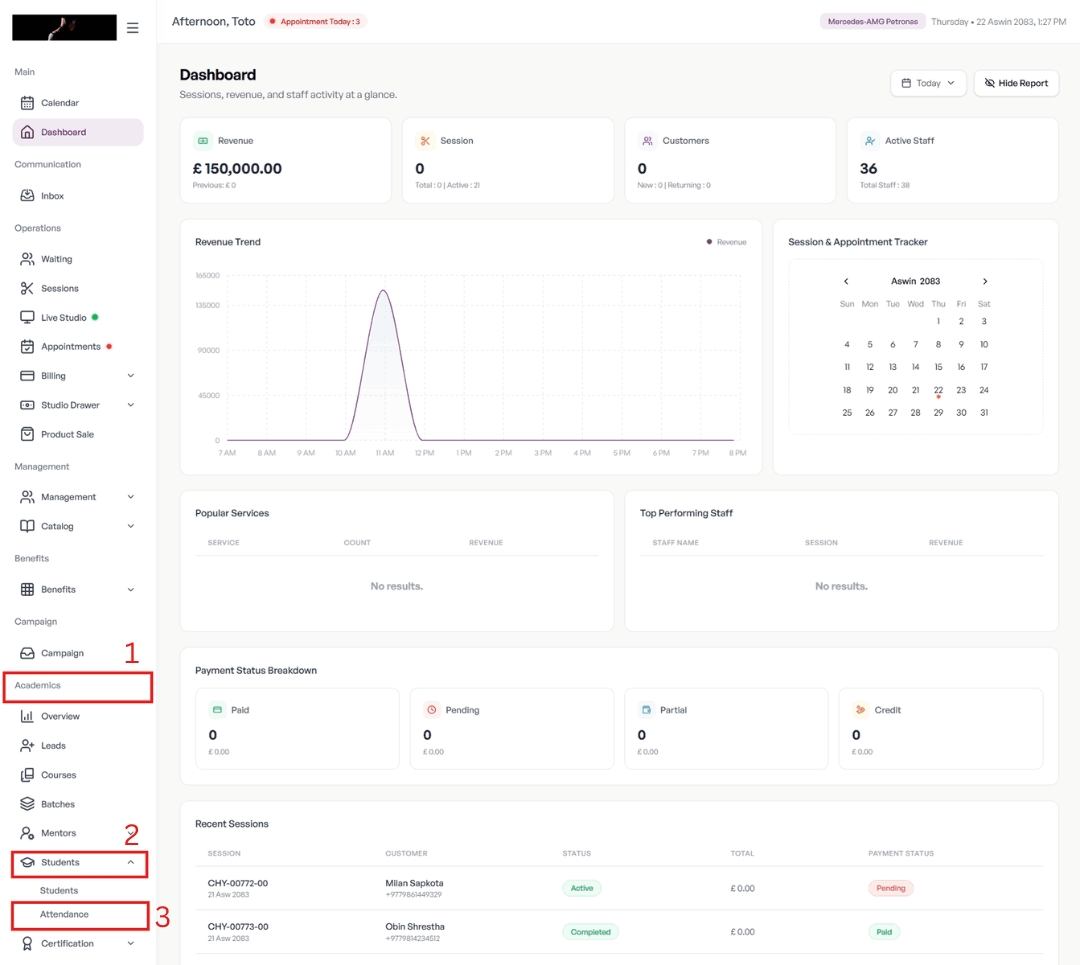
Student attendance records whether students are present or absent for each batch session.
- Go to Academics > Student > Attendance.
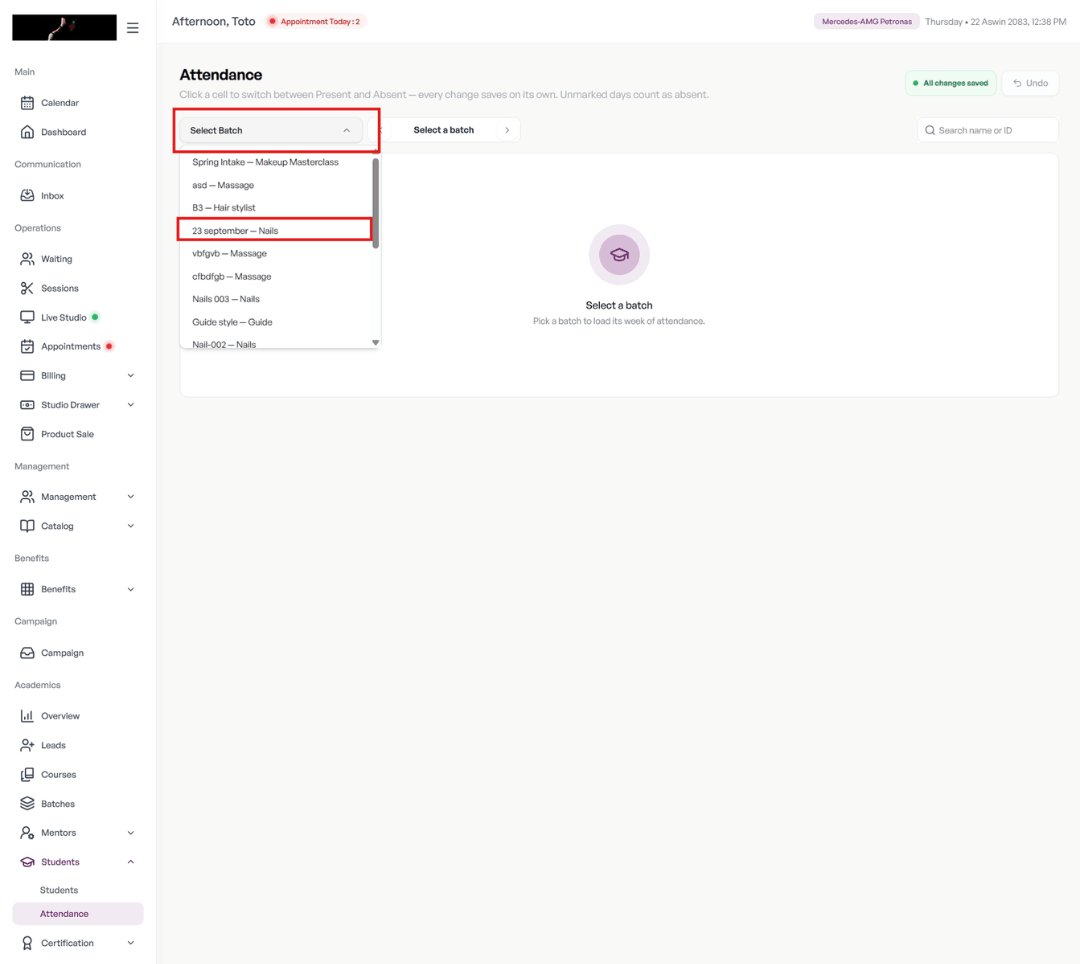
- At the top left, choose a batch from the Select Batch dropdown.
- Find the required date and select the attendance box in the student’s row.
- The box switches between P (Present) and A (Absent).
Manage Leads and Course Enquiries
Leads are people who are interested in a course and may enroll later. They reach your academy in two ways: through an external enquiry form, or when your team adds them manually. One person can be a lead for several courses if they’re interested in more than one.
Add a Lead Manually
Go to Academics > Leads to see your leads and their details. 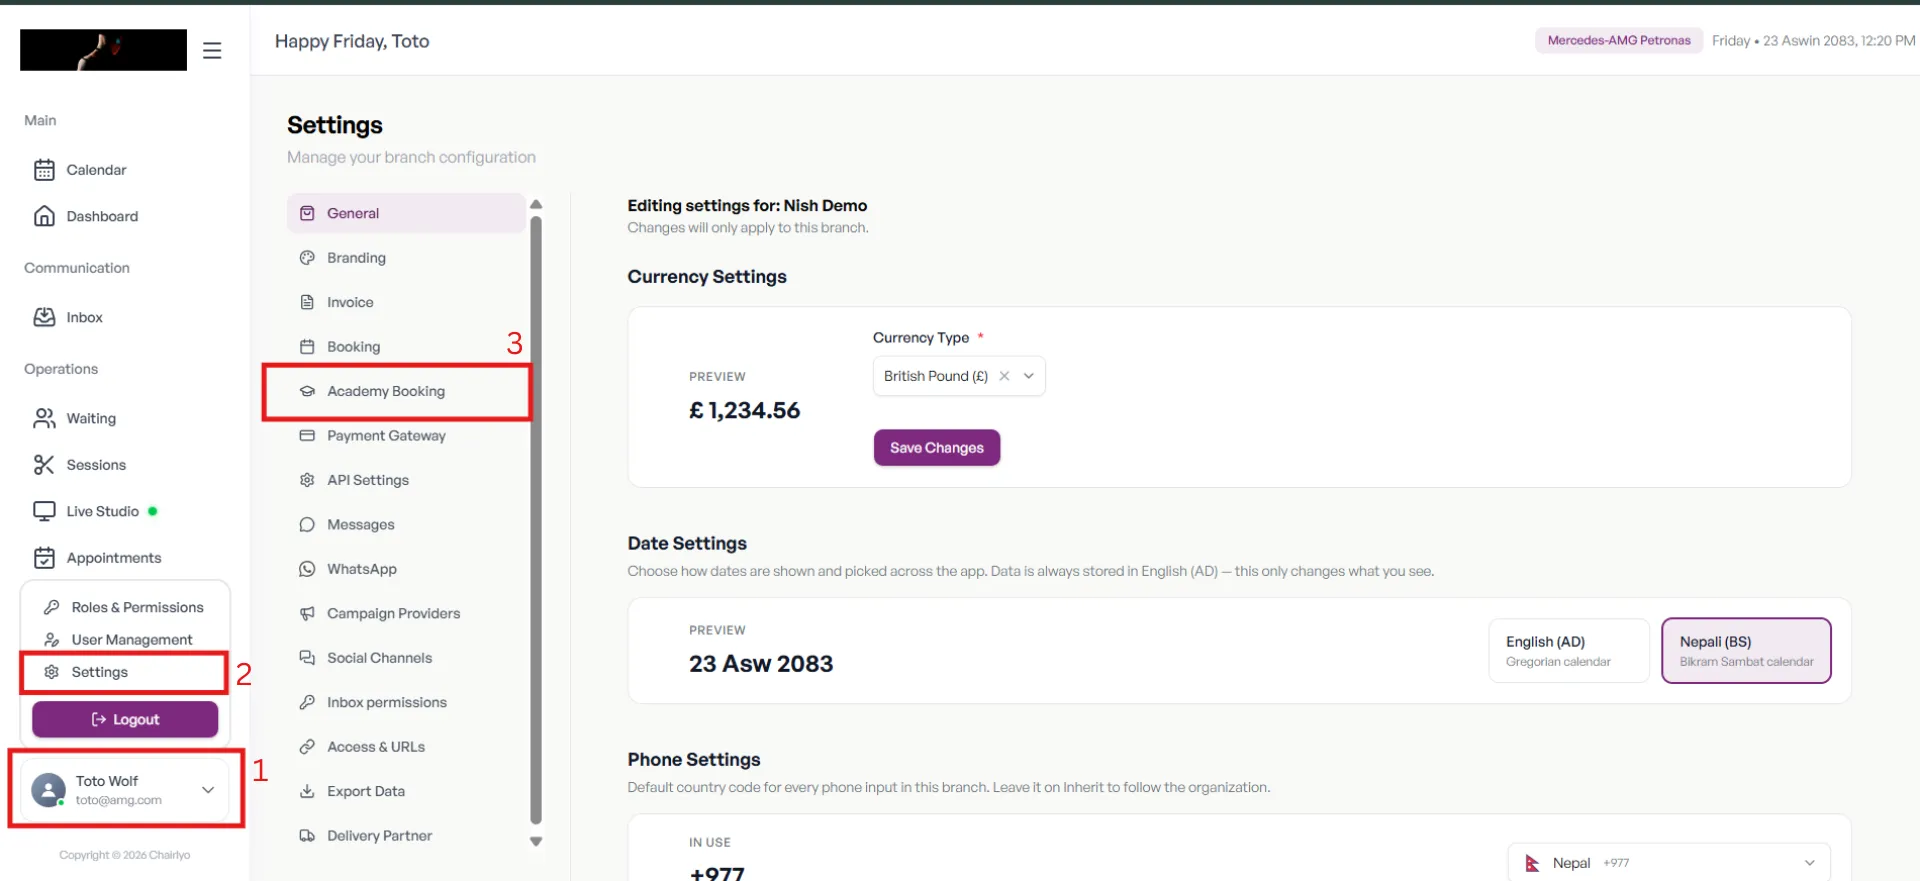
Select + Add Lead in the top-right corner. The form has three sections: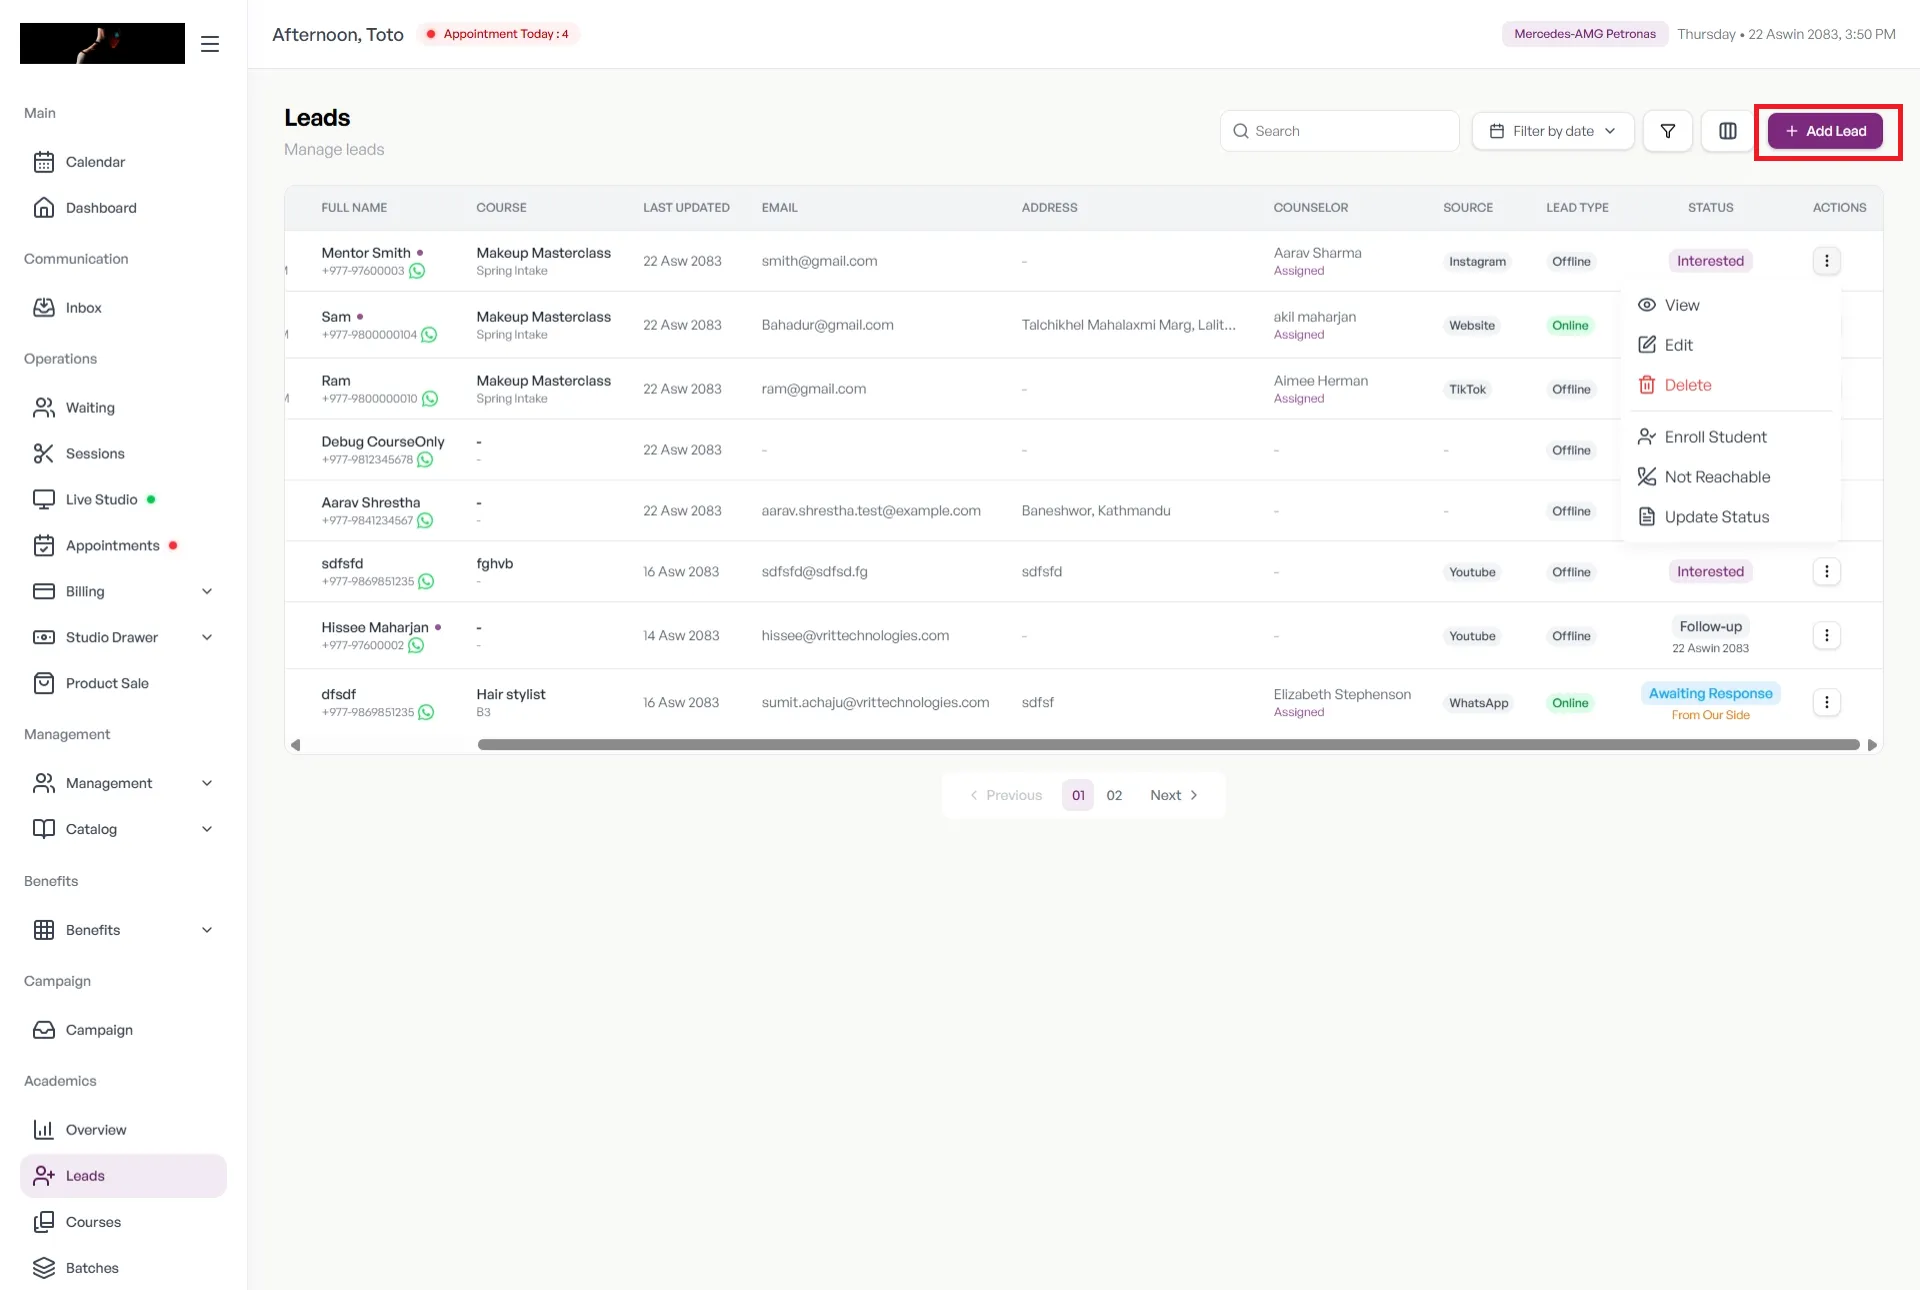
- Student Detail: the details of the person interested in the course
- Course Status: the course-related information
- Status Update: the lead’s current status, plus any notes in Update Notes
Select Save. Leads submitted through your external form appear in the Leads list automatically.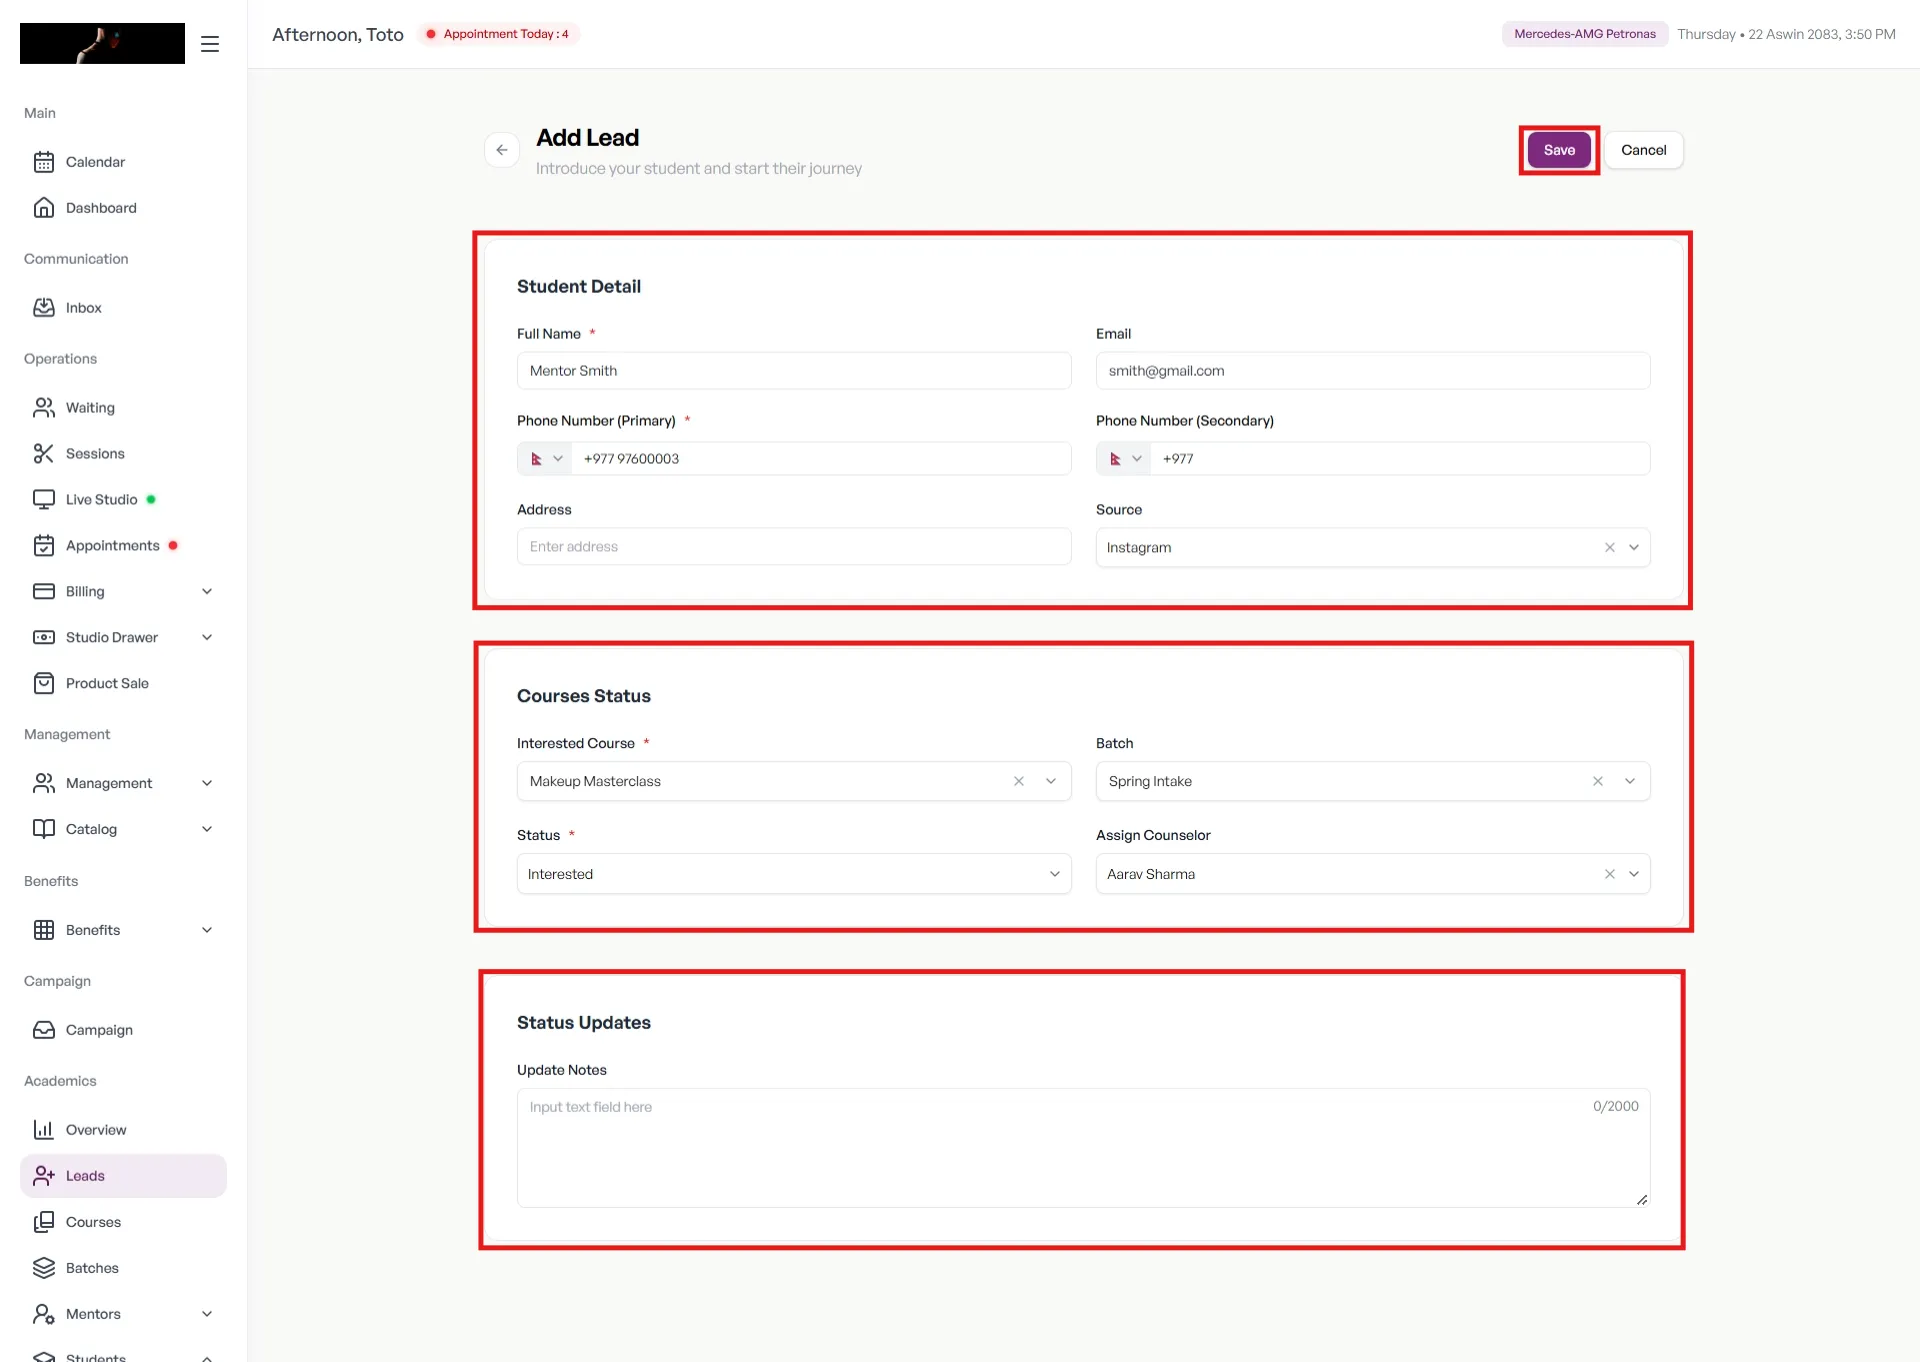
Update a Lead’s Status
As a lead moves toward enrollment, keep their status current.
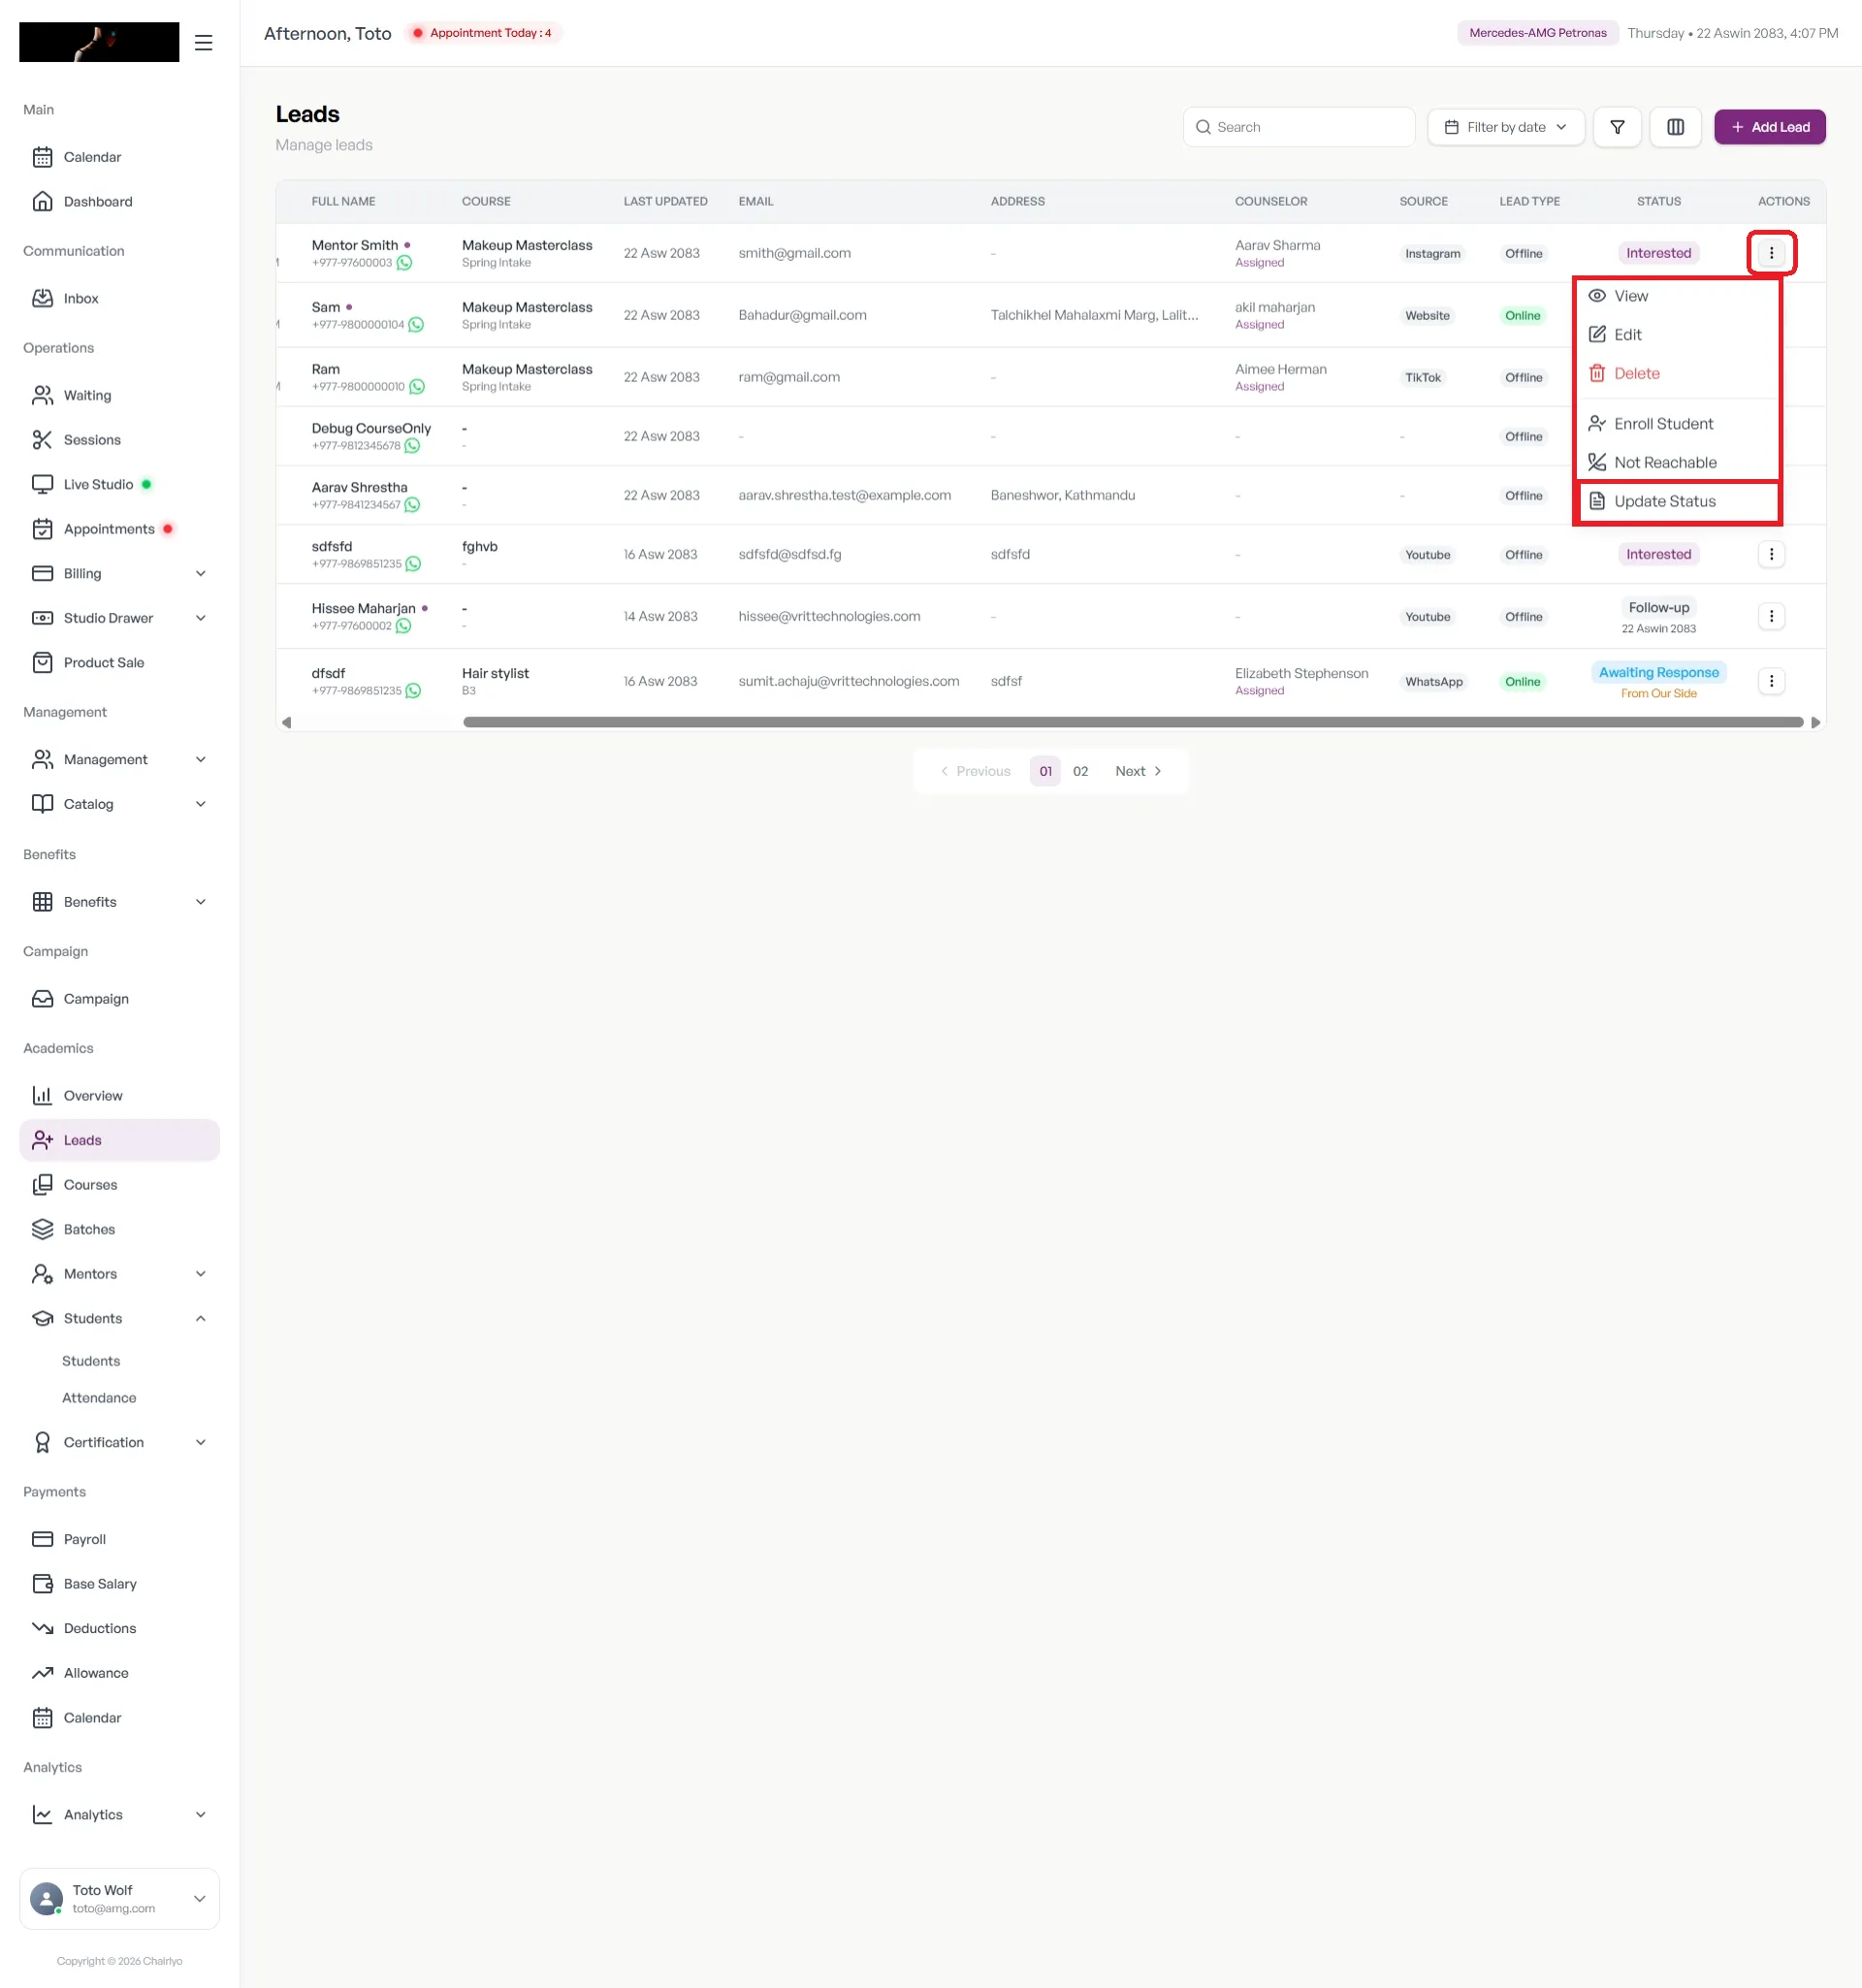
- In Leads, find the lead and select the three-dot action button in their row.
- Select Update Status.
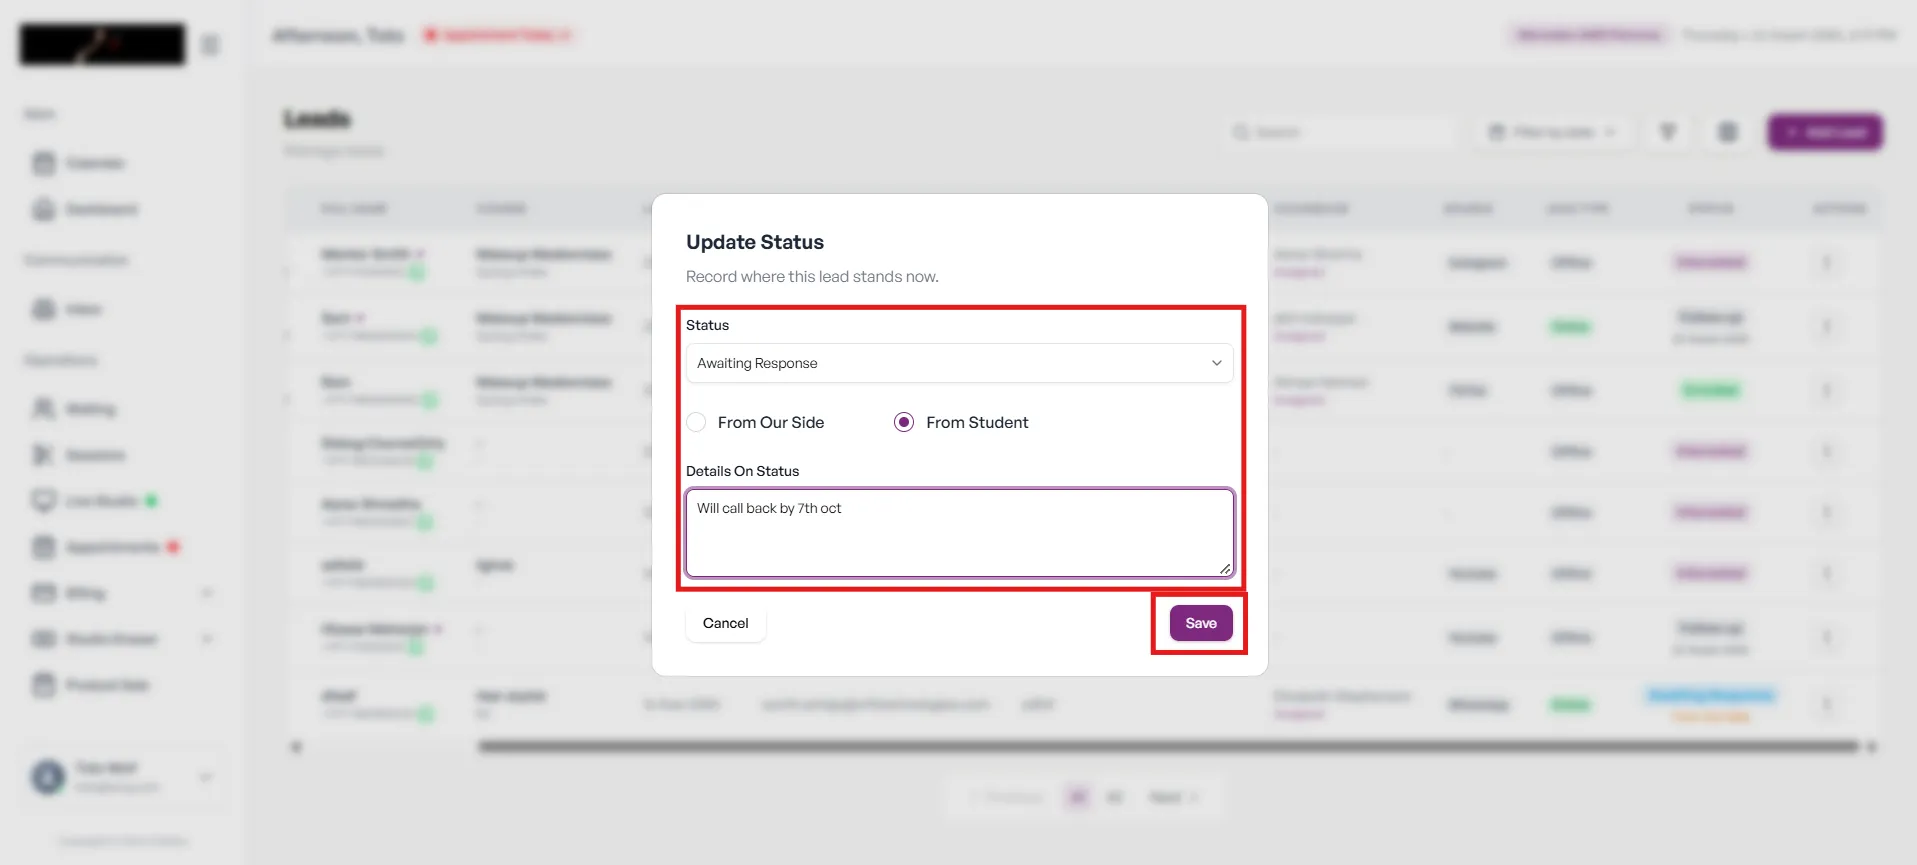
- Choose the right Status and review the details.
- Select Save.
View Lead Details
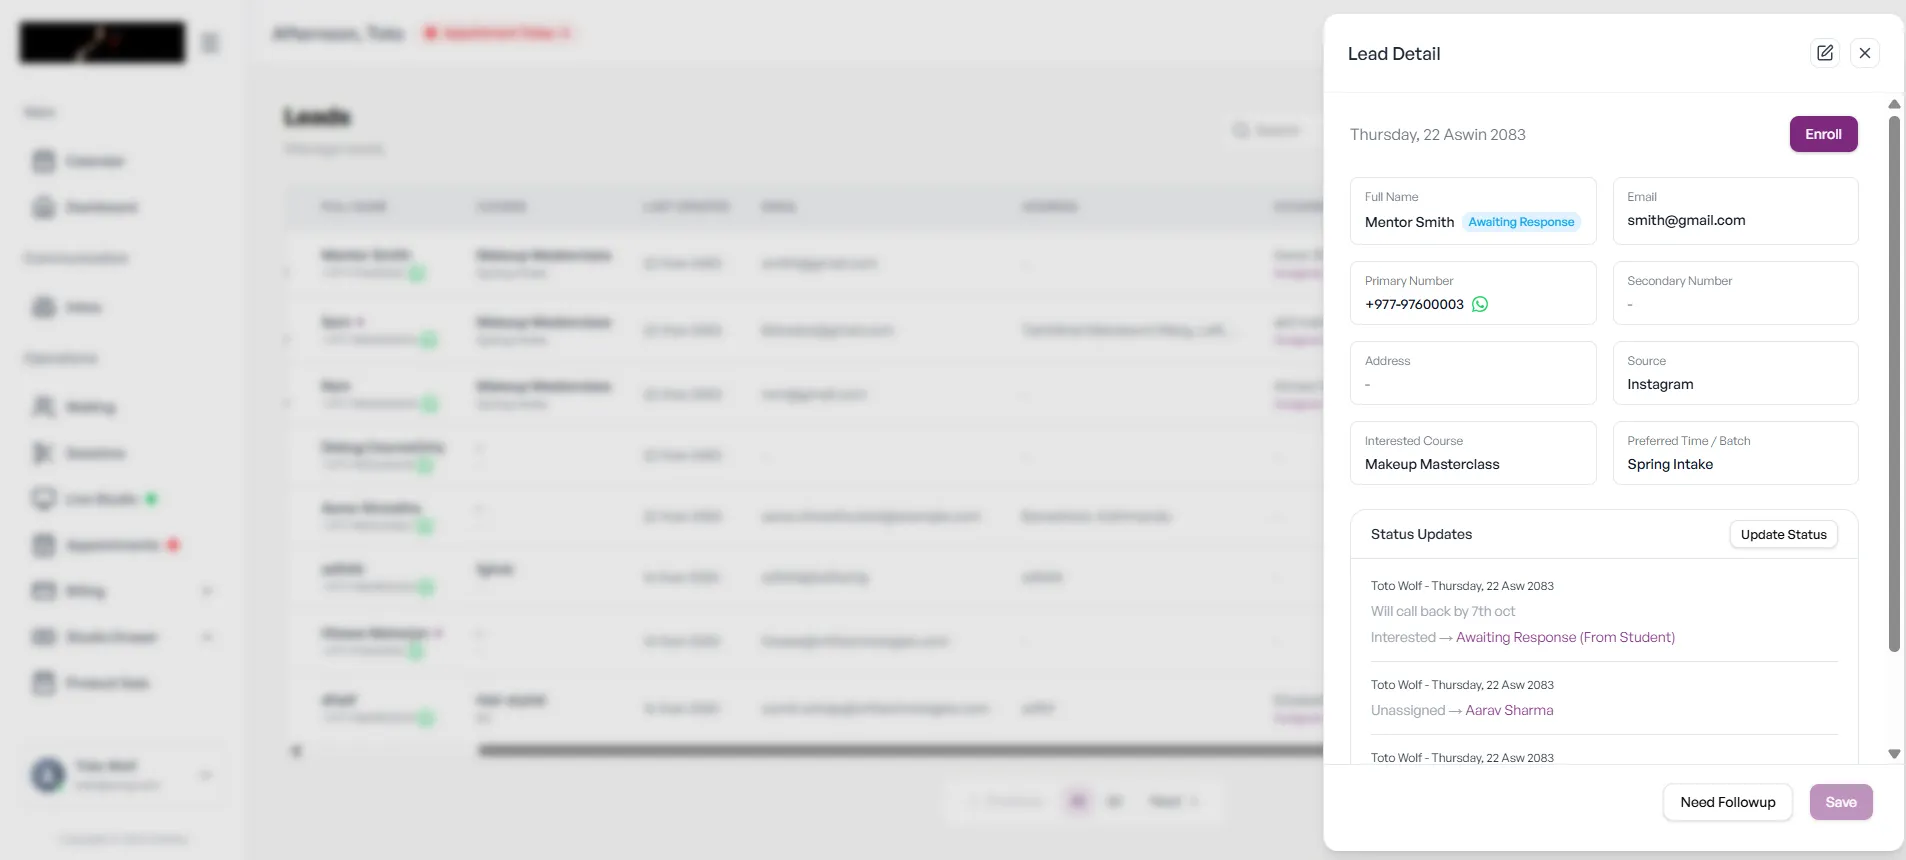
Select the three-dot action button on a lead’s row, then choose View. A side drawer opens with their details. 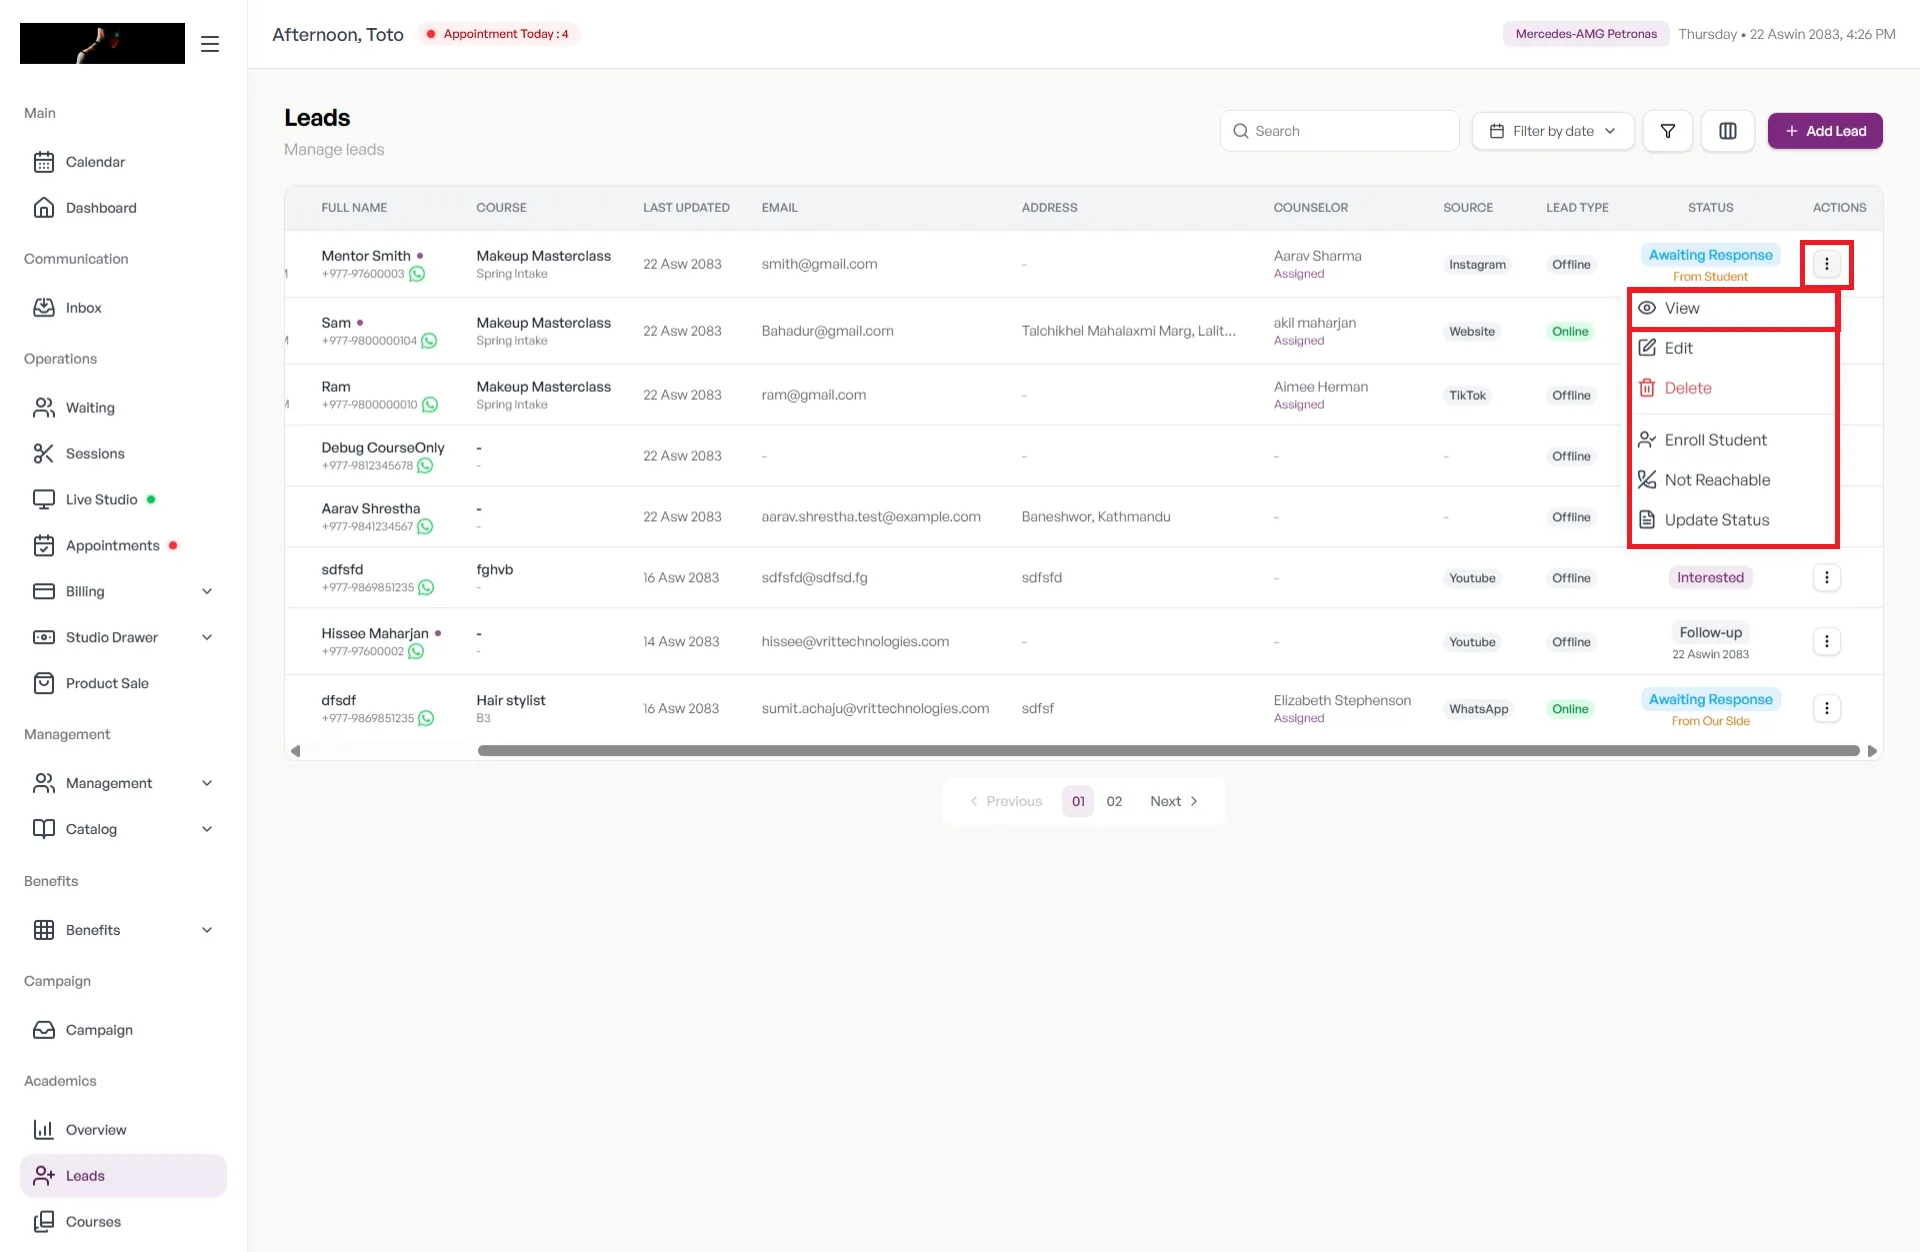
From here you can Enroll the lead, or select Need Follow Up if they need more contact.
Follow Up With a Lead
If someone is interested but not ready to enroll, mark them for follow-up.
- Open the lead’s details with View.
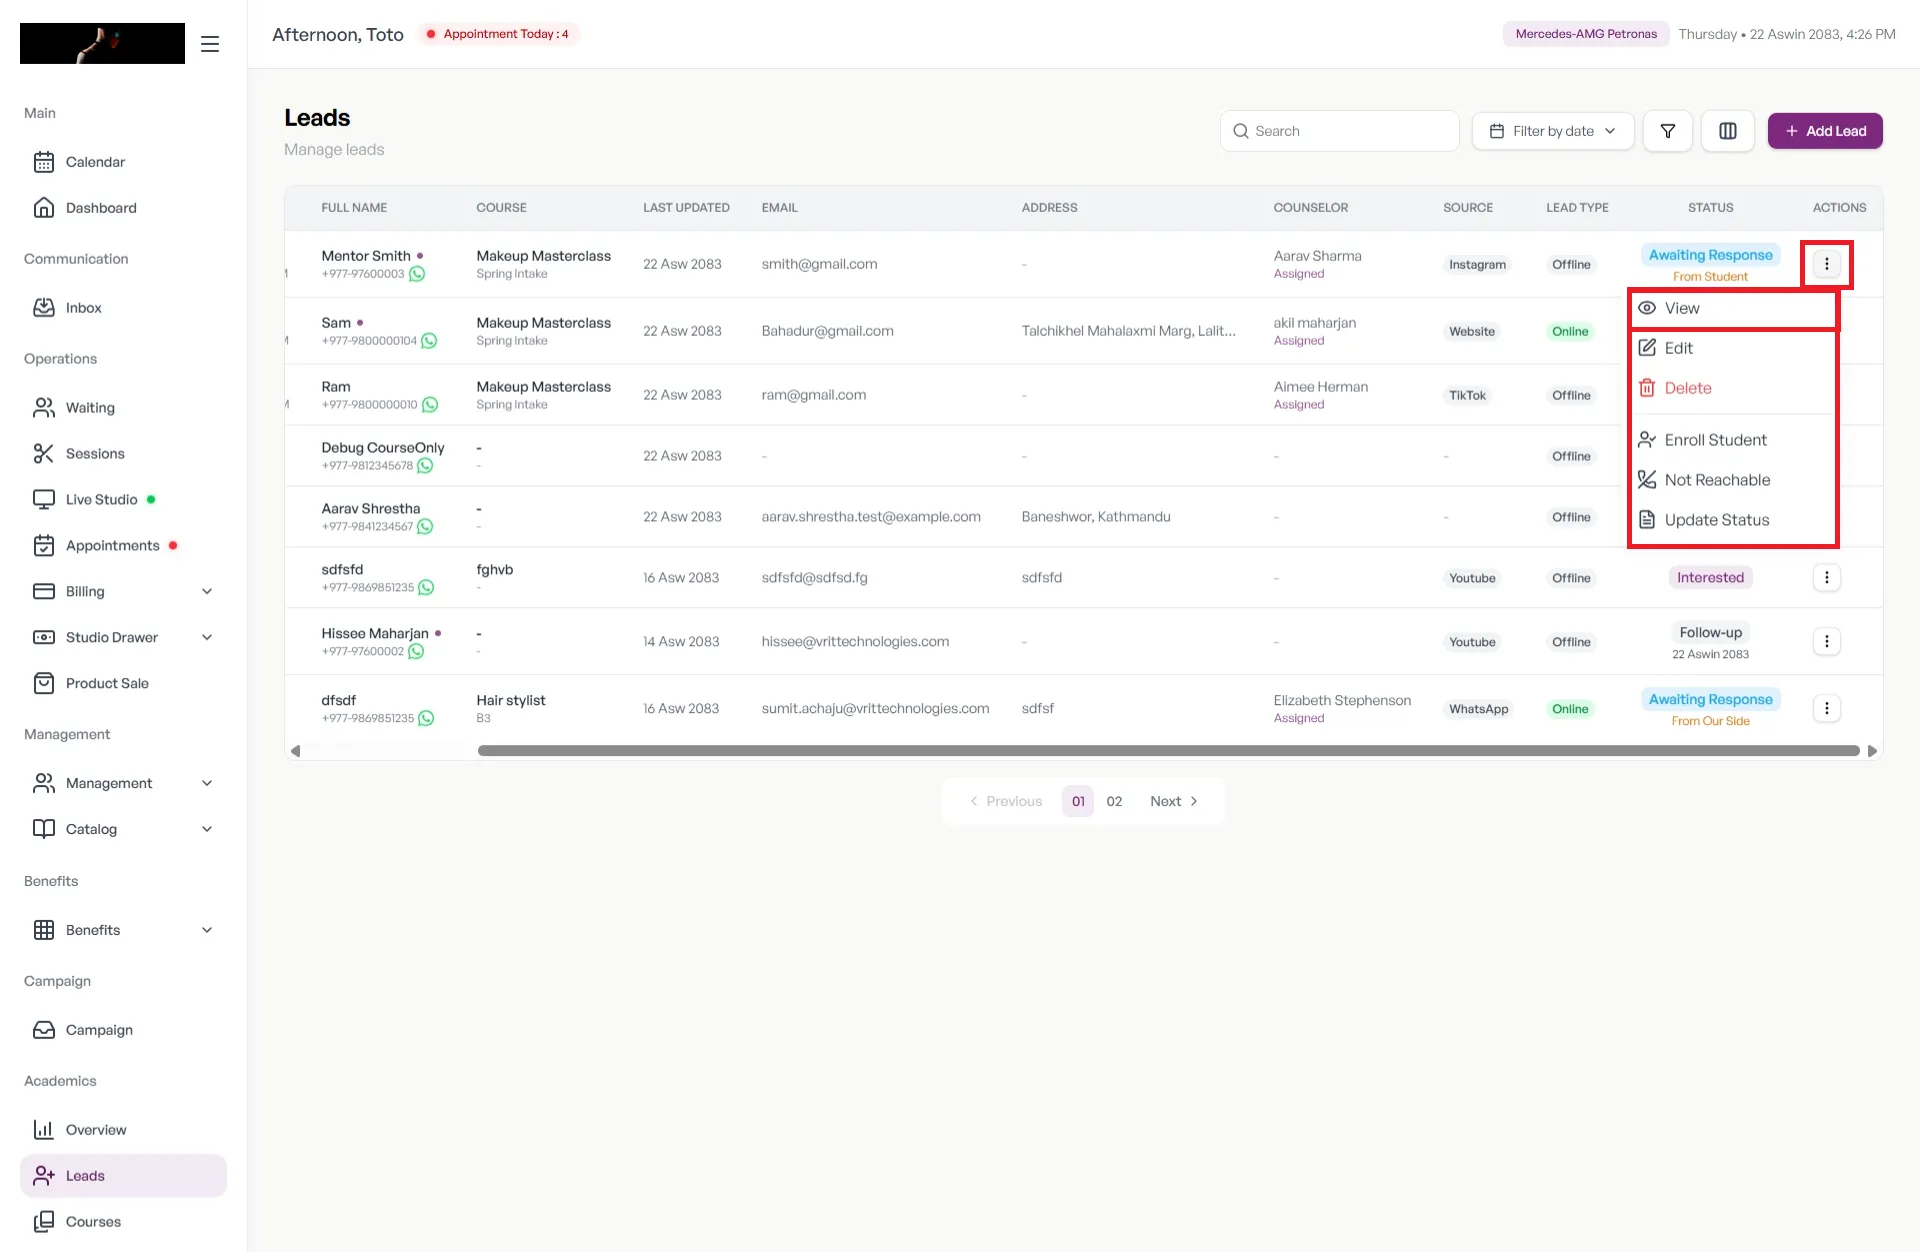
- Select Need Follow Up.
- Assign a Counselor and pick a Follow-up Date.
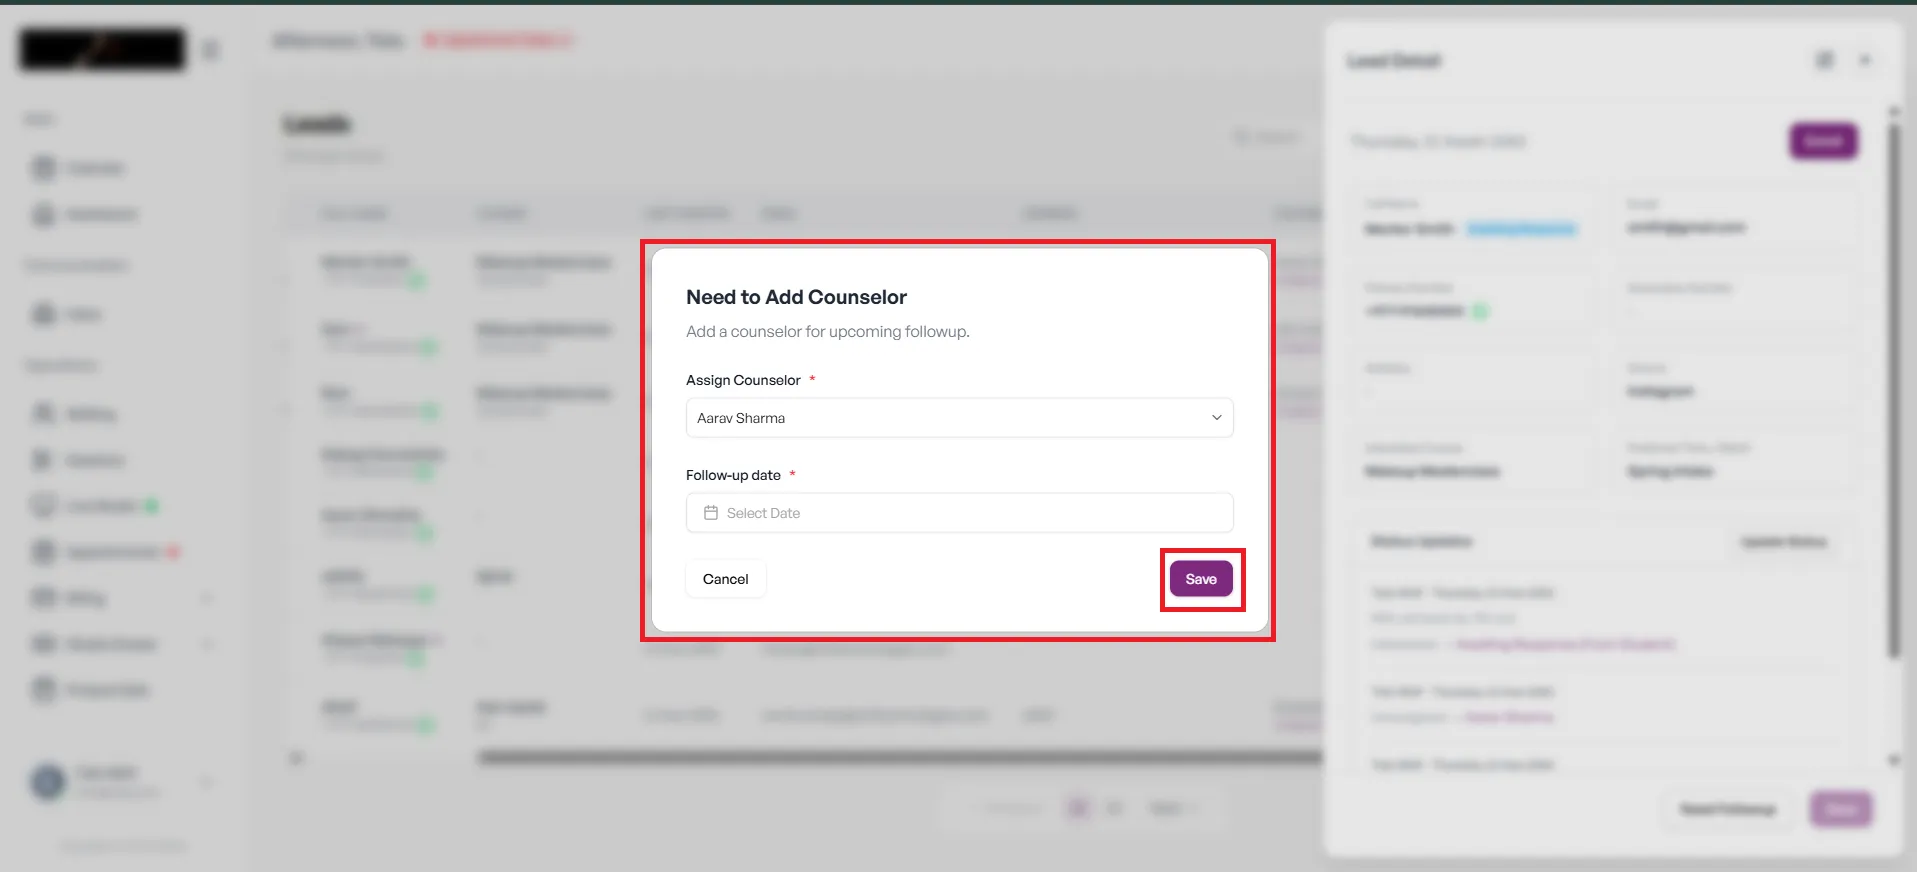
The assigned counselor can then contact the lead on that date.
Convert a Lead to a Student
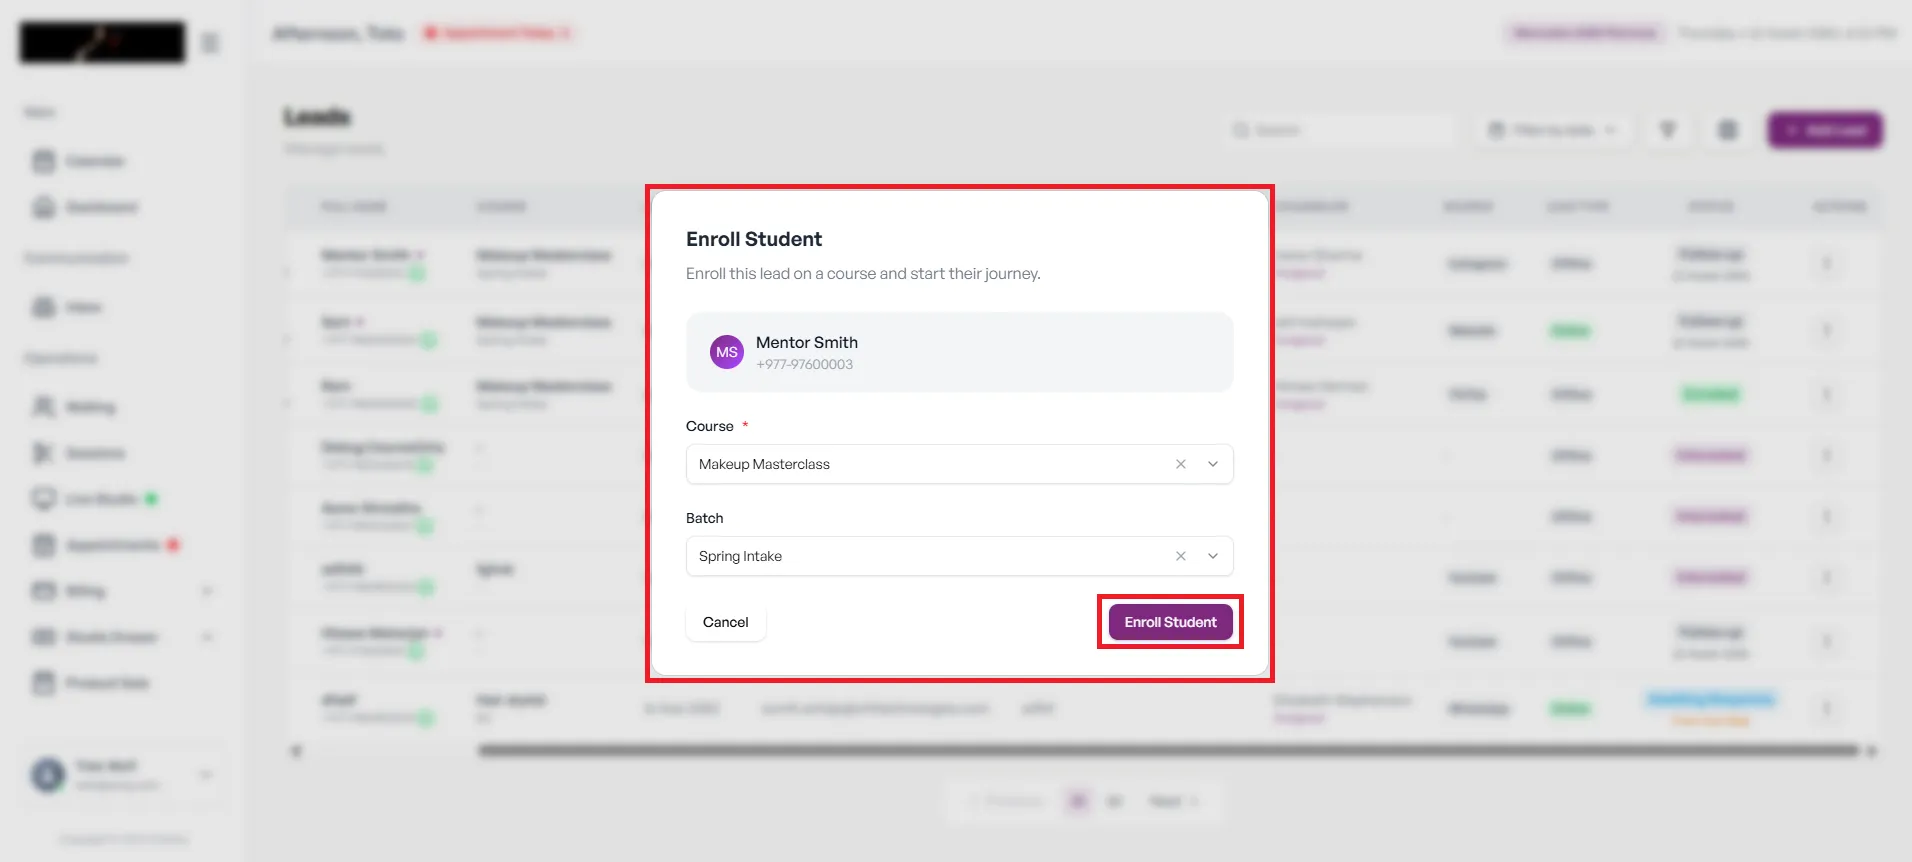
When a lead is ready, enroll them in a course and batch. There are two ways to start:
- From the Leads list: select the three-dot action button, then Enroll Student.
- From Lead Details: open View, then select Enroll.
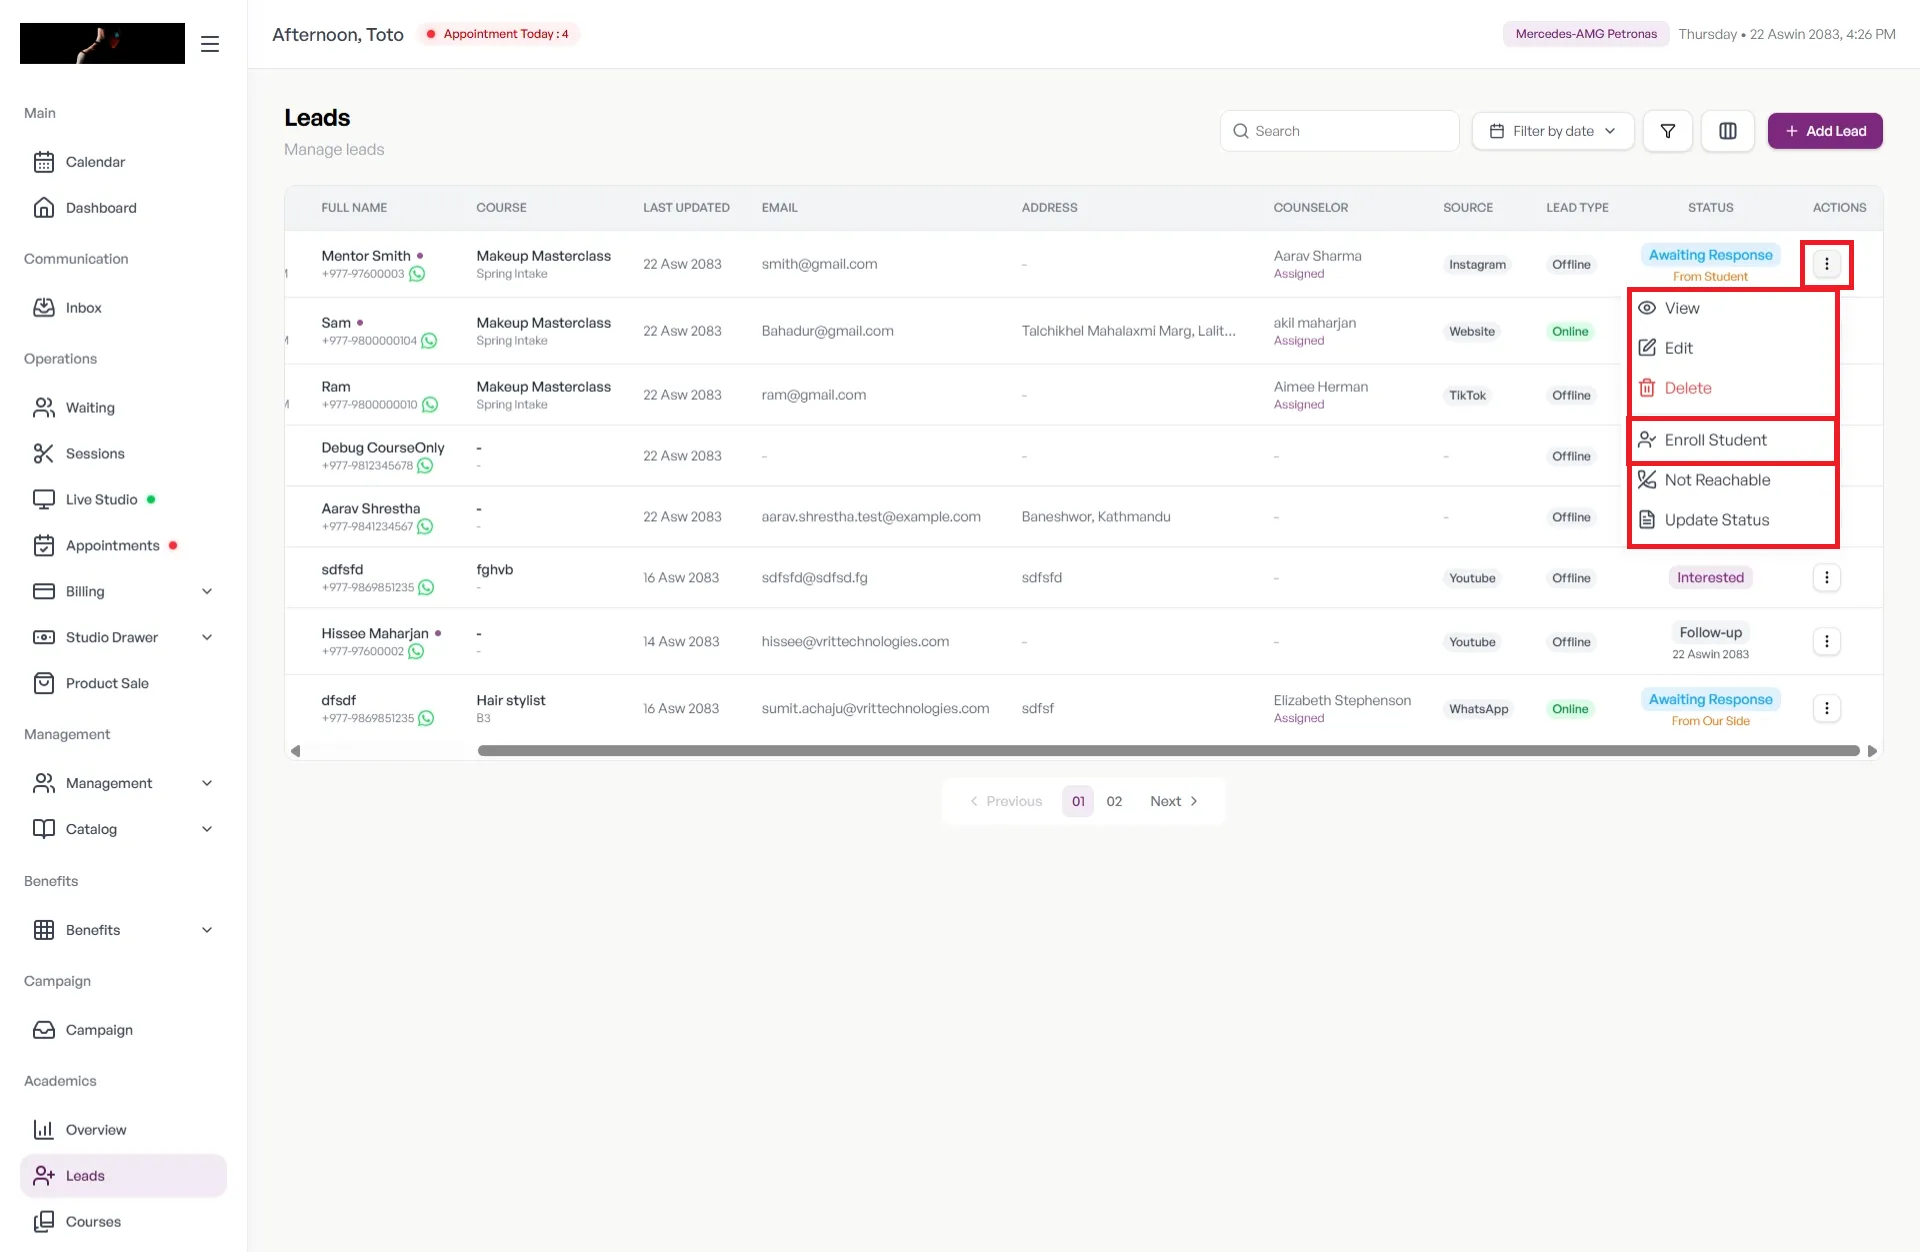
Both open the Enroll Student window. Choose the Course and Batch. The course doesn’t have to match the one the lead first asked about. Select Enroll Student to finish, or Cancel to stop. The lead then appears in your Students list.
Once a lead has been enrolled as a student, you can’t change the lead’s status again.
Enable the Academy Enquiry Form
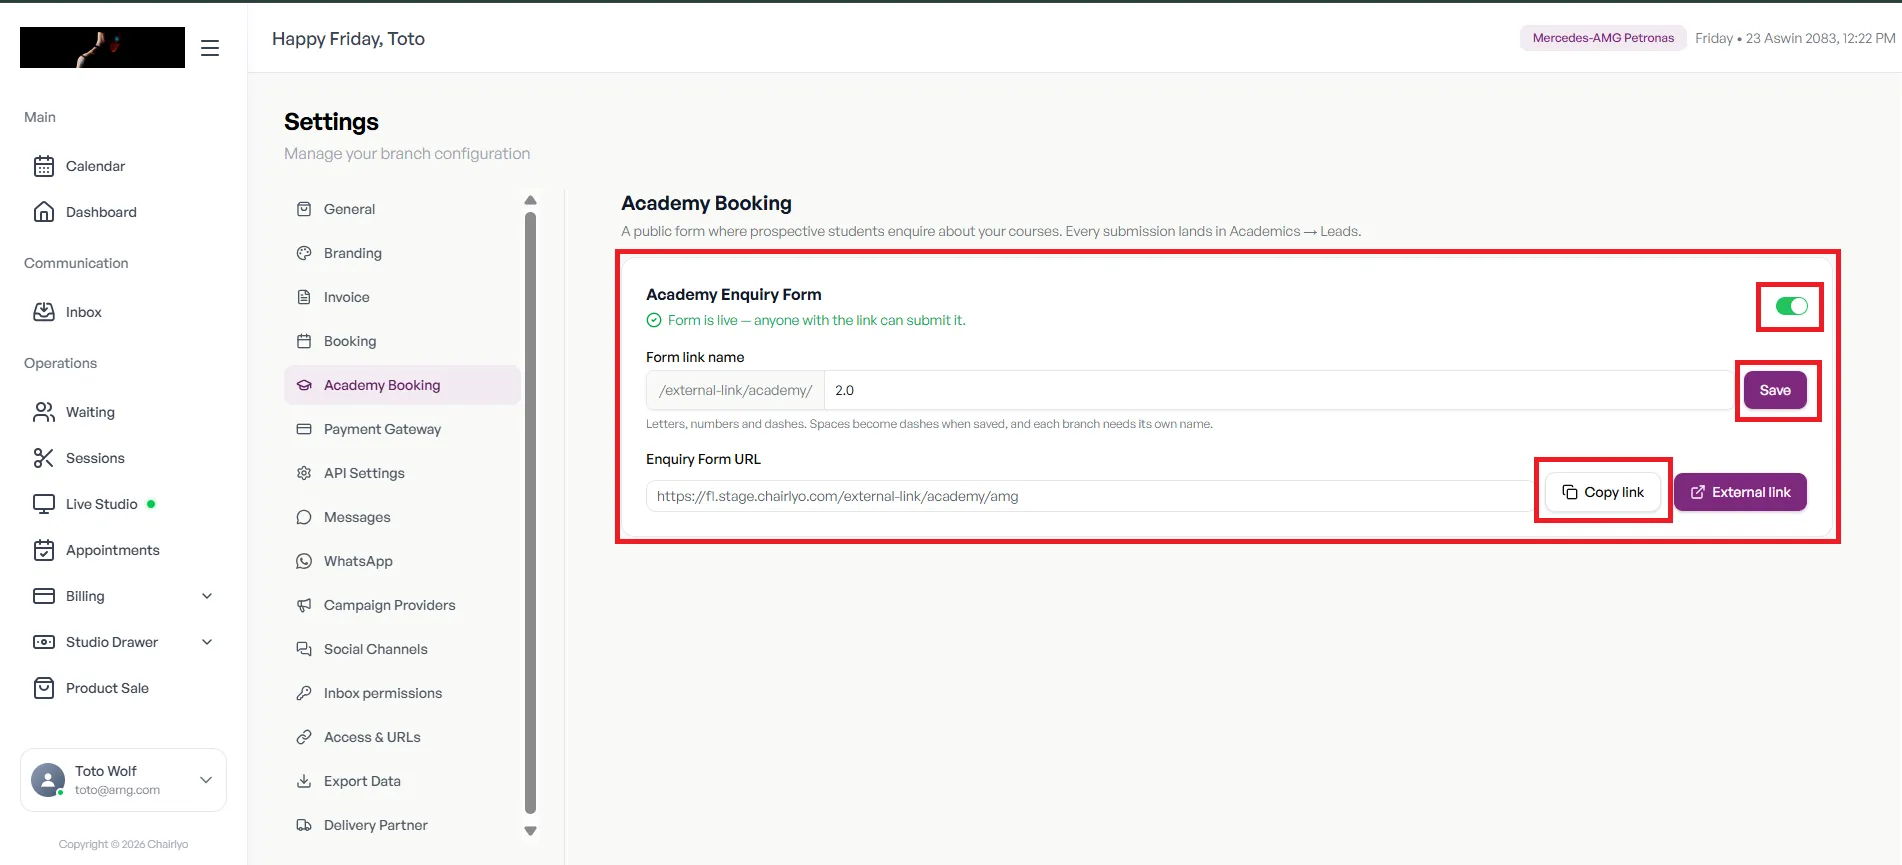
The enquiry form lets people ask about your courses without calling or messaging you. It works much like the online booking link you may already share for salon services. It’s disabled by default.
- Go to Settings > Academy Booking.
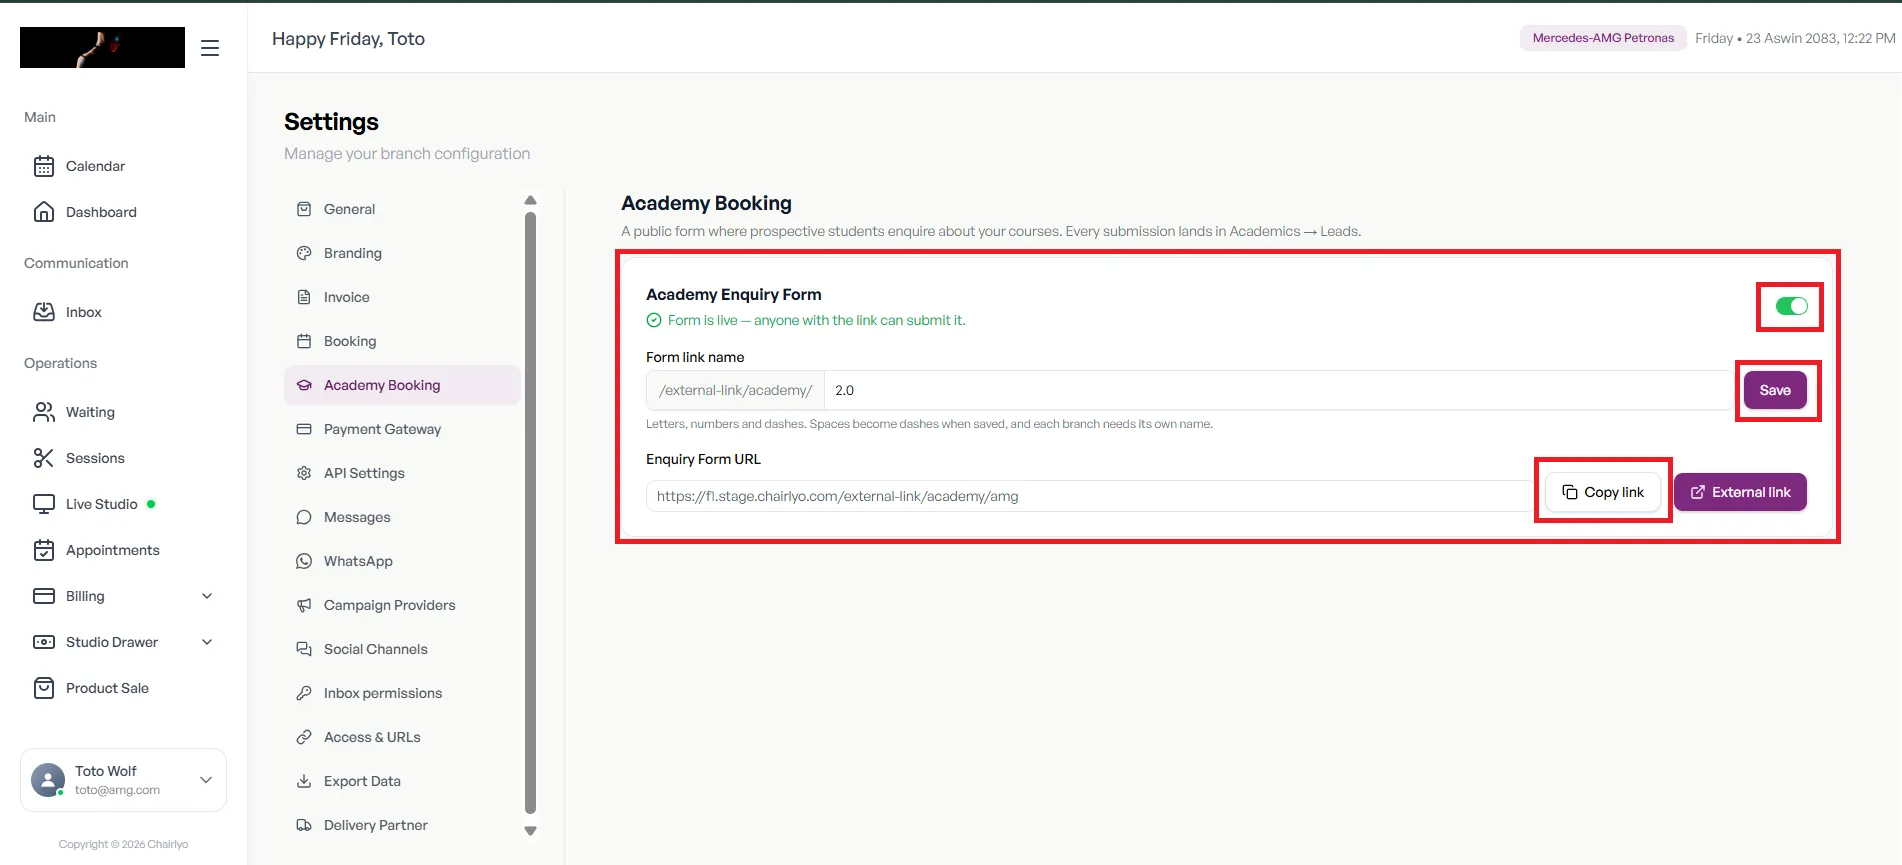
- Turn on the toggle in the top-right corner.
- Enter a Form Link Name and select Save.
- Select Copy Link to copy the form URL.
Share the link in your ads, social profiles or messages to collect enquiries.
Tips for Running Your Academy Smoothly
- Set up in order. Create the course and mentor before the batch, and the batch before enrollment.
- Turn on the enquiry form early. Leads collect automatically while you finish setup.
- Review who has access. If several people manage your academy, restrict what each team member can see and do.
Start Managing Your Academy With Chairlyo
With courses, mentors, batches, students and certificates in one place, you spend less time on admin and more on teaching. Not on Chairlyo yet? You can compare plan options before you start. If you’re still choosing a system, this checklist for choosing salon software in Nepal shows what to test first.
Frequently Asked Questions
What is the Academy module in Chairlyo?
It’s the part of Chairlyo for managing courses, mentors, batches, students and certificates in one place.
In what order should I set up my academy?
Start with the overview, then create a course, add a mentor, create a batch, add students, enroll them and issue certificates when the batch is complete.
Can I add external mentors?
Yes. When adding a mentor, choose whether they are Internal or External.
Can I enroll a lead in a different course than the one they asked about?
Yes. You choose the course and batch during enrollment.
Can I change a lead’s status after they enroll?
No. Once a lead is enrolled as a student, their status can’t be changed again.
How do I collect course enquiries online?
Enable the Academy Enquiry Form under Settings > Academy Booking, then share the copied link.
Author

Manjil Shrestha
Manjil Shrestha is an SEO Officer at Chairlyo, where he creates and optimizes content that helps salons, spas and beauty academies get more from their software.
Find more Similar Blogs
Run a smoother, more profitable salon with tools built for growth.

Ready to Transform Your Beauty Business?
Join thousands of salons, spas, wellness centers, and beauty clinics running smarter with Chairlyo.